Web Enumeration
Room Link: https://tryhackme.com/r/room/webenumerationv2
Manual Enumeration
We don't need to start unrolling the fancy toolkit from the get-go. More often than not, the results of using our own initiative over automated scans bare more results. For example, we may be able to find the "golden ticket" without making all of the noise. Let's outline some fundamentals skills involving you and your browser.
Your browser is as extensive as you are (and some!) and keeps records of the data it receives and who from. We can use this for a range of activities: finding that exact photo or more usefully -- the location of certain files or assets being loaded. This could include things from scripts to page URLs.
Using our Browsers Developer Console
Modern-day browsers including Chrome and Firefox have a suite of tools located in the "Developer Tools/Console". We're going to be discussing Firefox's, however, Chrome has a very similar suite. This suite includes a range of tools including:
Viewing page source code
Finding assets
Debugging & executing code such as javascript on the client-side (our Browser)
Using "F12" on our keyboard, this is a shortcut to launch this suite of tools.
Inspecting Tool
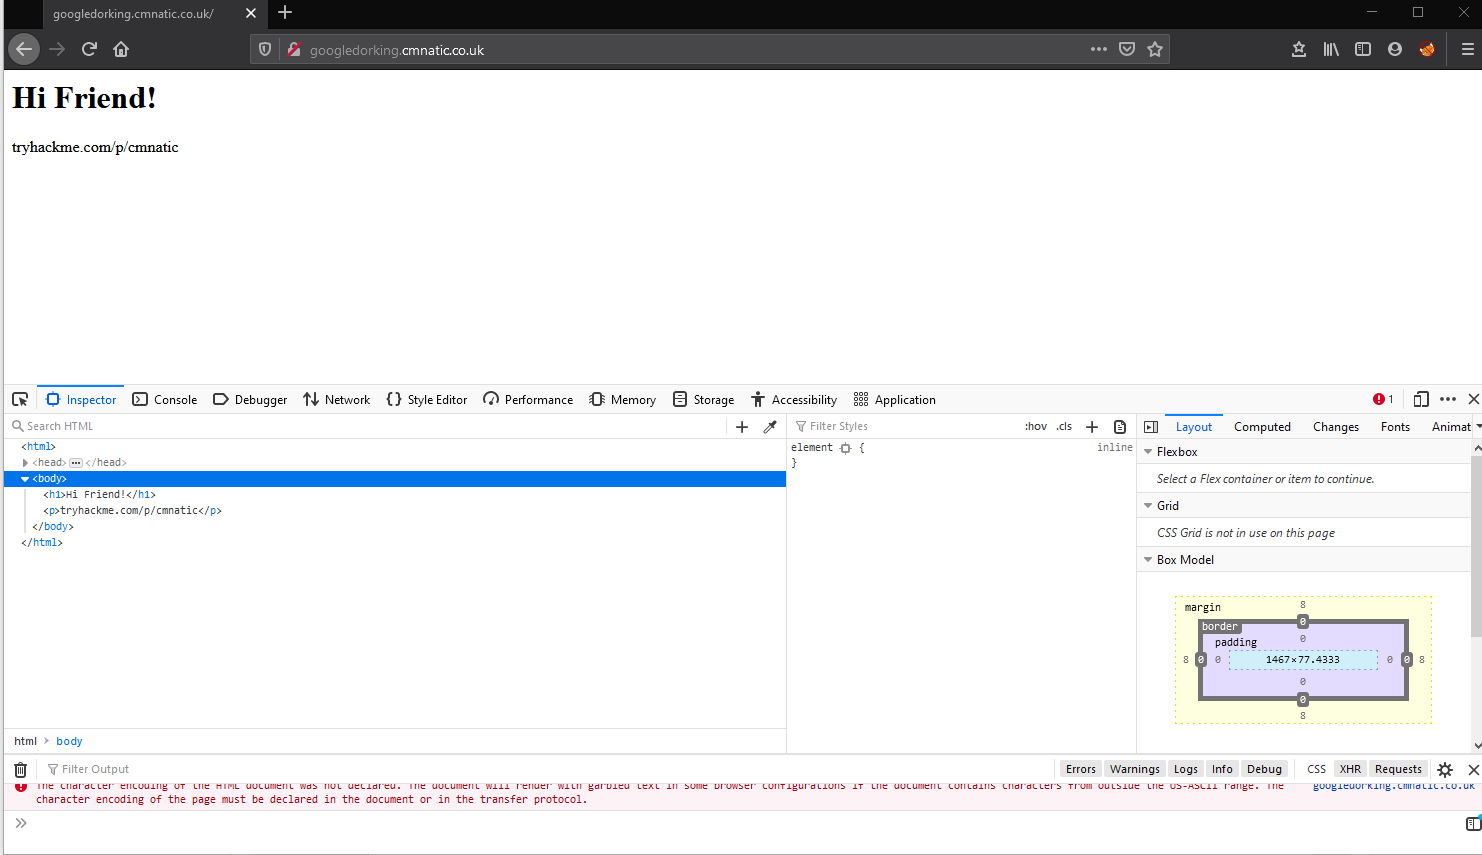
At first, we can see the web page with the heading "Hi Friend" and a section of the screen filled with the "Inspector" tool. This allows us to view the HTML source code of the webpage we have loaded in our browser. This often contains things such as developer comments, and the name to certain aspects of web page features including forms and the likes.
Developers often leave behind comments in the form of the <!-- --> tags...for example: <!-- This is a comment --> which are not rendered in the browser as we can see here:


Introduction to Gobuster
Welcome to the Gobuster portion of this room! This part of the room is aimed at complete beginners to enumeration and penetration testing. By completing this portion, you will have learned:
How to install Gobuster on Kali Linux
How to use the "dir" mode to enumerate directories and several of its most useful options
How to use the "dns" mode to enumerate domains/subdomains and several of its most useful option
Where to go for help
At the end of this section, you will have the opportunity to practice what you have learned by using Gobuster on another room, Blog. This room utilizes what's called a Content Management System (CMS) in order to make things easier for the user. These typically have large and varied directory structures...perfect for directory enumeration with Gobuster!
With the introduction out of the way, let's get started!
What is Gobuster?
As the name implies, Gobuster is written in Go. Go is an open-source, low-level language (much like C or Rust) developed by a team at Google and other contributors. If you'd like to learn more about Go, visit the website linked above.
Installing Gobuster on Kali Linux
Luckily, installing Gobuster on Kali Linux does not require any installation of Go and does not carry with it a complicated install process. This means no building from source or running any other complicated commands. Ready?sudo apt install gobusterDone.
Useful Global Flags
There are some useful Global flags that can be used as well. I've included them in the table below. You can review these in the main documentation as well - here.
-t
--threads
Number of concurrent threads (default 10)
-v
--verbose
Verbose output
-z
--no-progress
Don't display progress
-q
--quiet
Don't print the banner and other noise
-o
--output
Output file to write results to
I will typically change the number of threads to 64 to increase the speed of my scans. If you don't change the number of threads, Gobuster can be a little slow.
Gobuster Modes
"dir" Mode
Dirbuster has a "dir" mode that allows the user to enumerate website directories. This is useful when you are performing a penetration test and would like to see what the directory structure of a website is. Often, directory structures of websites and web-apps follow a certain convention, making them susceptible to brute-forcing using wordlists. At the end of this room, you'll run Gobuster on Blog which uses WordPress, a very common Content Management System (CMS). WordPress uses a very specific directory structure for its websites.
Gobuster is powerful because it not only allows you to scan the website, but it will return the status codes as well. This will immediately let you know if you as an outside user can request that directory or not. Additional functionality of Gobuster is that it lets you search for files as well with the addition of a simple flag!
Using "dir" Mode
To use "dir" mode, you start by typing gobuster dir. This isn't the full command, but just the start. This tells Gobuster that you want to perform a directory search, instead of one of its other methods (which we'll get to). It has to be written like this or else Gobuster will complain. After that, you will need to add the URL and wordlist using the -u and -w options, respectively. Like so:
gobuster dir -u http://10.10.10.10 -w /usr/share/wordlists/dirbuster/directory-list-2.3-medium.txt
Note: The URL is going to be the base path where Gobuster starts looking from. So the URL above is using the root web directory. For example, in a typical Apache installation on Linux, this is /var/www/html. So if you have a "products" directory and you want to enumerate that directory, you'd set the URL as http://10.10.10.10/products. You can also think of this like http://example.com/path/to/folder. Also notice that I specified the protocol of HTTP. This is important and required.
This is a very common, simple, and straightforward command for Gobuster. This is typically what I will run when doing capture the flag style rooms on TryHackMe. However, there are some other helpful flags that can be useful in certain scenarios
Other Useful Flags
These flags are useful in certain scenarios. Note that these are not all of the flag options, but some of the more common ones that you'll use in penetration tests and in capture the flag events. If you'd like the full list, you can see that here.
-c
--cookies
Cookies to use for requests
-x
--extensions
File extension(s) to search for
-H
--headers
Specify HTTP headers, -H 'Header1: val1' -H 'Header2: val2'
-k
--no-tls-validation
Skip TLS certificate verification
-n
--no-status
Don't print status codes
-P
--password
Password for Basic Auth
-s
--status-codes
Positive status codes
-b
--status-codes-blacklist
Negative status codes
-U
--username
Username for Basic Auth
A very common use of Gobuster's "dir" mode is the ability to use it's -x or --extensions flag to search for the contents of directories that you have already enumerated by providing a list of file extensions. File extensions are generally representative of the data they may contain. For example, .conf or .config files usually contain configurations for the application - including sensitive info such as database credentials.
A few other files that you may wish to search for are .txt files or other web application pages such as .html or .php . Let's assemble a command that would allow us to search the "myfolder" directory on a webserver for the following three files:
1. html
2. js
3. css
gobuster dir -u http://10.10.252.123/myfolder -w /usr/share/wordlists/dirbuster/directory-list-2.3-medium.txt -x.html,.css,.js
The -k Flag
The -k flag is special because it has an important use during penetration tests and captures the flag events. In a capture the flag room on TryHackMe for example, if HTTPS is enabled, you will most likely encounter an invalid cert error like the one below
 In instances like this, if you try to run Gobuster against this without the
 -k flag, it won't return anything and will most likely error out with something gross and will leave you sad. Don't worry though, easy fix! Just add the -k flag to your scan and it will bypass this invalid certification and continue scanning and deliver the goods!
Note: This flag can be used with "dir" mode and "vhost" modes
"dns" Mode
The next mode we'll focus on is the "dns" mode. This allows Gobuster to brute-force subdomains. During a penetration test (or capture the flag), it's important to check sub-domains of your target's top domain. Just because something is patched in the regular domain, does not mean it is patched in the sub-domain. There may be a vulnerability for you to exploit in one of these sub-domains. For example, if State Farm owns statefarm.com and mobile.statefarm.com, there may be a hole in mobile.statefarm.com that is not present in statefarm.com. This is why it is important to search for subdomains too!
Using "dns" Mode
To use "dns" mode, you start by typing gobuster dns. Just like "dir" mode, this isn't the full command, but just the start. This tells Gobuster that you want to perform a sub-domain brute-force, instead of one of one of the other methods as previously mentioned. It has to be written like this or else Gobuster will complain. After that, you will need to add the domain and wordlist using the -d and -w options, respectively. Like so:
gobuster dns -d mydomain.thm -w /usr/share/wordlists/SecLists/Discovery/DNS/subdomains-top1million-5000.txt
This tells Gobuster to do a sub-domain scan on the domain "mydomain.thm". If there are any sub-domains available, Gobuster will find them and report them to you in the terminal.
Other Useful Flags
-d and -w are the main flags that you'll need for most of your scans. But there are a few others that are worth mentioning that we can go over. They are in the table below.
-c
--show-cname
Show CNAME Records (cannot be used with '-i' option)
-i
--show-ips
Show IP Addresses
-r
--resolver
Use custom DNS server (format server.com or server.com:port)
There aren't many additional flags to be used with this mode, but these are the main useful ones that you may use from time to time. If you'd like to see the full list of flags that can be used with this mode, check out the documentation
"vhost" Mode
The last and final mode we'll focus on is the "vhost" mode. This allows Gobuster to brute-force virtual hosts. Virtual hosts are different websites on the same machine. In some instances, they can appear to look like sub-domains, but don't be deceived! Virtual Hosts are IP based and are running on the same server. This is not usually apparent to the end-user. On an engagement, it may be worthwhile to just run Gobuster in this mode to see if it comes up with anything. You never know, it might just find something! While participating in rooms on TryHackMe, virtual hosts would be a good way to hide a completely different website if nothing turned up on your main port 80/443 scan.
Using "vhost" Mode
To use "vhost" mode, you start by typing gobuster vhost. Just like the other modes, this isn't the full command, but just the start. This tells Gobuster that you want to perform a virtual host brute-force, instead of one of the other methods as previously mentioned. It has to be written like this or else Gobuster will complain. After that, you will need to add the domain and wordlist using the -u and -w options, respectively. Like so:
gobuster vhost -u http://example.com -w /usr/share/wordlists/SecLists/Discovery/DNS/subdomains-top1million-5000.txt
This will tell Gobuster to do a virtual host scan http://example.com using the selected wordlist.
Other Useful Flags
A lot of the same flags that are useful for "dir" mode actually still apply to virtual host mode. Please check out the "dir" mode section for these and take a look at the official documentation for the full list. There's really too many that are similar to put them back here.
Useful Wordlists
There are many useful wordlists to use for each mode. These may or may not come in handy later on during the VM portion of the room! I'll go over some of the ones that are on Kali by default as well as a short section on SecLists.
Kali Linux Default Lists
Below you will find a useful list of wordlists that are installed on Kali Linux by default. This is as of the latest version at the time of writing which is 2020.3. Anything with a wildcard (*) character indicates there's more than one list that matches. Keep in mind, a lot of these can be interchanged between modes. For example, "dir" mode wordlists (such as ones from the dirbuster directory) will contain words like "admin", "index", "about", "events", etc. A lot of these could be subdomains as well. Give them a try with the different modes!
/usr/share/wordlists/dirbuster/directory-list-2.3-*.txt
/usr/share/wordlists/dirbuster/directory-list-1.0.txt
/usr/share/wordlists/dirb/big.txt
/usr/share/wordlists/dirb/common.txt
/usr/share/wordlists/dirb/small.txt
/usr/share/wordlists/dirb/extensions_common.txt - Useful for when fuzzing for files!
Non-Standard Lists
In addition to the above, Daniel Miessler has created an amazing GitHub repo called SecLists. It compiles many different lists used for many different things. The best part is, it's in apt! You can sudo apt install seclists and get the entire repo! We won't dive into any other lists as there are many. However, between what's installed by default on Kali and the SecLists repo, I doubt you'll need anything else.
Practical: Gobuster (Deploy #1)
Run a directory scan on the host. Other than the standard css, images and js directories, what other directories are available?
Kali

Run a directory scan on the host. In the "C******" directory, what file extensions exist?
Kali

There's a flag out there that can be found by directory scanning! Find it!
Added php as one of the file extenion types.
Kali

There are some virtual hosts running on this server. What are they?
Kali

There's another flag to be found in one of the virtual hosts! Find it!
Kali

Introduction to WPScan
First released in June 2011, WPScan has survived the tests of time and stood out as a tool that every pentester should have in their toolkits.
The WPScan framework is capable of enumerating & researching a few security vulnerability categories present in WordPress sites - including - but not limited to:
Sensitive Information Disclosure (Plugin & Theme installation versions for disclosed vulnerabilities or CVE's)
Path Discovery (Looking for misconfigured file permissions i.e. wp-config.php)
Weak Password Policies (Password bruteforcing)
Presence of Default Installation (Looking for default files)
Testing Web Application Firewalls (Common WAF plugins)
Installing WPScan
Thankfully for us, WPScan comes pre-installed on the latest versions of penetration testing systems such as Kali Linux and Parrot. If you are using an older version of Kali Linux (such as 2019) for example, WPScan is in the apt repository, so can be installed by a simple sudo apt update && sudo apt install wpscan

Installing WPScan on other operating systems such as Ubuntu or Debian involves extra steps. Whilst the TryHackMe AttackBox comes pre-installed with WPScan, you can follow the developer's installation guide for your local environment.
A Primer on WPScan's Database
WPScan uses information within a local database as a primary reference point when enumerating for themes and plugins. As we'll come to detail later, a technique that WPScan uses when enumerating is looking for common themes and plugins. Before using WPScan, it is highly recommended that you update this database before performing any scans.
Thankfully, this is an easy process to do. Simply run wpscan --update
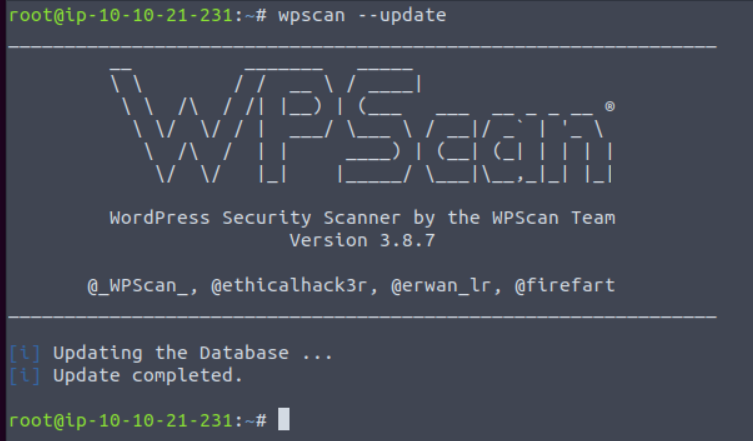
WPScan Modes
Enumerating for Installed Themes
WPScan has a few methods of determining the active theme on a running WordPress installation. At a premise, it boils down to a technique that we can manually do ourselves. Simply, we can look at the assets our web browser loads and then looks for the location of these on the webserver. Using the "Network" tab in your web browsers developer tools, you can see what files are loaded when you visit a webpage.
Take the screenshot below, we can see many assets are loaded, some of these will be scripts & the stylings of the theme that determines how the browser renders the website. Highlighted in the screenshot below is the URL: http://redacted/wp-content/themes/twentytwentyone/assets/
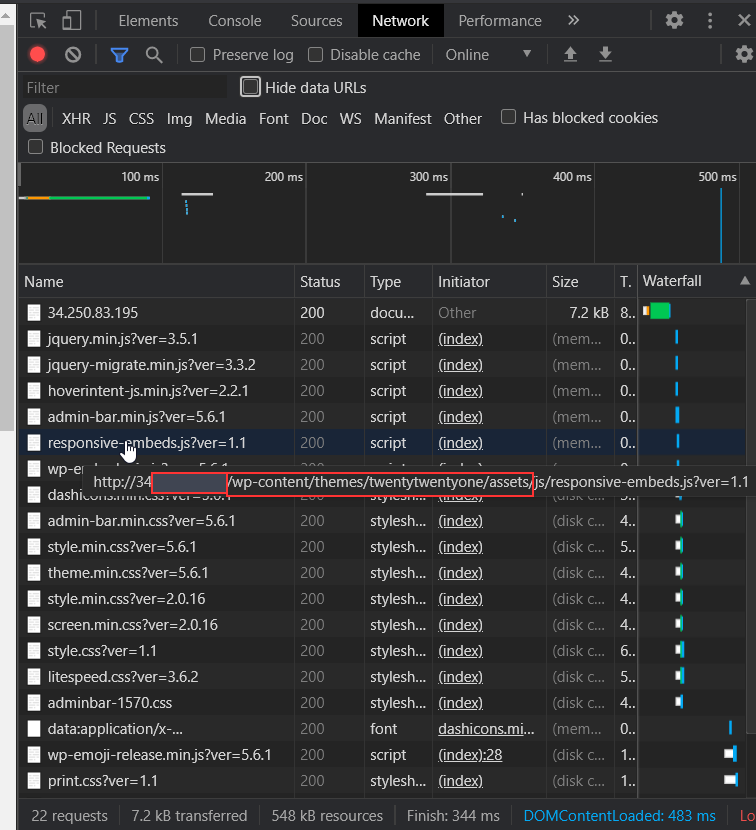
We can take a pretty good guess that the name of the current theme is "twentytwentyone". After inspecting the source code of the website, we can note additional references to "twentytwentyone"

However, let's use WPScan to speed this process up by using the --enumerate flag with the t argument like so:
wpscan --url http://cmnatics.playground/ --enumerate t
After a couple of minutes, we can begin to see some results:
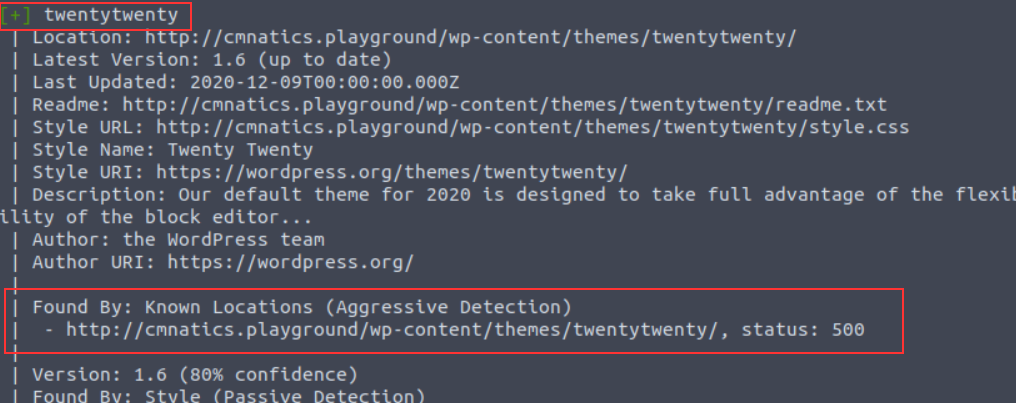
The great thing about WPScan is that the tool lets you know how it determined the results it has got. In this case, we're told that the "twentytwenty" theme was confirmed by scanning "Known Locations". The "twentytwenty" theme is the default WordPress theme for WordPress versions in 2020.
Enumerating for Installed Plugins
A very common feature of webservers is "Directory Listing" and is often enabled by default. Simply, "Directory Listing" is the listing of files in the directory that we are navigating to (just as if we were to use Windows Explorer or Linux's ls command. URL's in this context are very similar to file paths. The URL http://cmnatics.playground/a/directory is actually the configured root of the webserver/a/directory:

"Directory Listing" occurs when there is no file present that the webserver has been told to process. A very common file is "index.html" and "index.php". As these files aren't present in /a/directory, the contents are instead displayed:
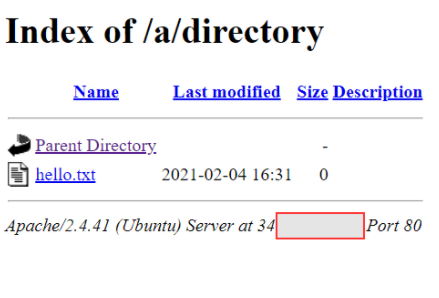
WPScan can leverage this feature as one technique to look for plugins installed. Since they will all be located in /wp-content/plugins/pluginname, WPScan can enumerate for common/known plugins.
In the screenshot below, "easy-table-of-contents" has been discovered. Great! This could be vulnerable. To determine that, we need to know the version number. Luckily, this handed to us on a plate by WordPress.
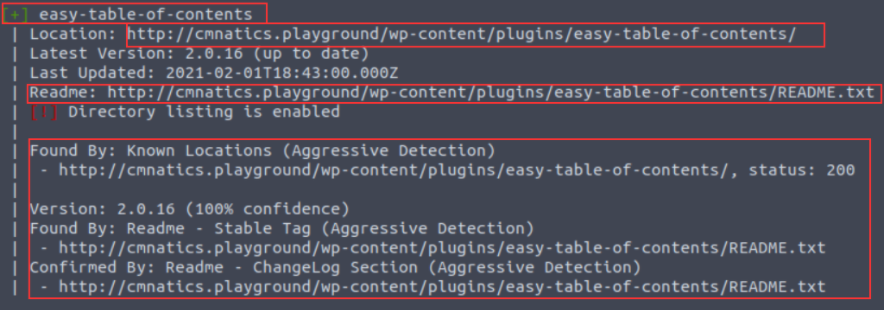
Reading through WordPress' developer documentation, we can learn about "Plugin Readme's" to figure out how WPScan determined the version number. Simply, plugins must have a "README.txt" file. This file contains meta-information such as the plugin name, the versions of WordPress it is compatible with and a description.

An Example ReadMe. (WordPress Developer Documentation., 2021)
WPScan uses additional methods to discover plugins (such as looking for references or embeds on pages for plugin assets). We can use the --enumerate flag with the p argument like so:
wpscan --url http://cmnatics.playground/ --enumerate p
Enumerating for Users
We've highlighted that WPScan is capable of performing brute-forcing attacks. Whilst we must provide a password list such as rockyou.txt, the way how WPScan enumerates for users is interestingly simple. WordPress sites use authors for posts. Authors are in fact a type of user. 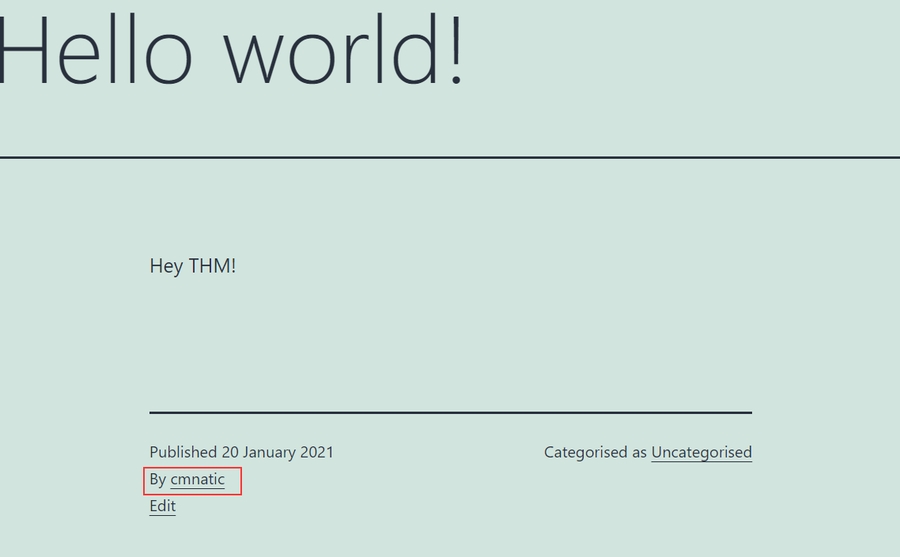
And sure enough, this author is picked up by our WPScan:

This scan was performed by using the --enumerate flag with the u argument like so:
wpscan --url http://cmnatics.playground/ --enumerate u
The "Vulnerable" Flag
In the commands so far, we have only enumerated WordPress to discover what themes, plugins and users are present. At the moment, we'd have to look at the output and use sites such as MITRE, NVD and CVEDetails to look up the names of these plugins and the version numbers to determine any vulnerabilities.
WPScan has the v argument for the --enumerate flag. We provide this argument alongside another (such as p for plugins). For example, our syntax would like so: wpscan --url http://cmnatics.playground/ --enumerate vp
Note, that this requires setting up WPScan to use the WPVulnDB API which is out-of-scope for this room.

Performing a Password Attack
After determining a list of possible usernames on the WordPress install, we can use WPScan to perform a bruteforcing technique against the username we specify and a password list that we provide. Simply, we use the output of our username enumeration to build a command like so: wpscan –-url http://cmnatics.playground –-passwords rockyou.txt –-usernames cmnatic

Adjusting WPScan's Aggressiveness (WAF)
Unless specified, WPScan will try to be as least "noisy" as possible. Lots of requests to a web server can trigger things such as firewalls and ultimately result in you being blocked by the server.
This means that some plugins and themes may be missed by our WPScan. Luckily, we can use arguments such as --plugins-detection and an aggressiveness profile (passive/aggressive) to specify this. For example: --plugins-detection aggressive
Summary - Cheatsheet
p
Enumerate Plugins
--enumerate p
t
Enumerate Themes
--enumerate t
u
Enumerate Usernames
--enumerate u
v
Use WPVulnDB to cross-reference for vulnerabilities. Example command looks for vulnerable plugins (p)
--enumerate vp
aggressive
This is an aggressiveness profile for WPScan to use.
--plugins-detection aggressive
Practical: WPScan (Deploy #2)
Enumerate the site, what is the name of the theme that is detected as running?
Kali

Enumerate the site, what is the name of the plugin that WPScan has found?
Kali

Enumerate the site, what username can WPScan find?
Kali

Construct a WPScan command to brute-force the site with this username, using the rockyou wordlist as the password list. What is the password to this user?
Kali

Introduction to Nikto
Initially released in 2001, Nikto has made leaps and bounds over the years and has proven to be a very popular vulnerability scanner due to being both open-source nature and feature-rich. Nikto is capable of performing an assessment on all types of webservers (and isn't application-specific such as WPScan.). Nikto can be used to discover possible vulnerabilities including:
Sensitive files
Outdated servers and programs (i.e. vulnerable web server installs)
Common server and software misconfigurations (Directory indexing, cgi scripts, x-ss protections)
Installing Nikto
Thankfully for us, Nikto comes pre-installed on the latest versions of penetration testing systems such as Kali Linux and Parrot. If you are using an older version of Kali Linux (such as 2019) for example, Nikto is in the apt repository, so can be installed by a simple sudo apt update && sudo apt install nikto
Installing Nikto on other operating systems such as Ubuntu or Debian involves extra steps. Whilst the TryHackMe AttackBox comes pre-installed with Nikto, you can follow the developer's installation guide for your local environment.
Nikto Modes
Basic Scanning
The most basic scan can be performed by using the -h flag and providing an IP address or domain name as an argument. This scan type will retrieve the headers advertised by the webserver or application (I.e. Apache2, Apache Tomcat, Jenkins or JBoss) and will look for any sensitive files or directories (i.e. login.php, /admin/, etc)
An example of this is the following: nikto -h vulnerable_ip
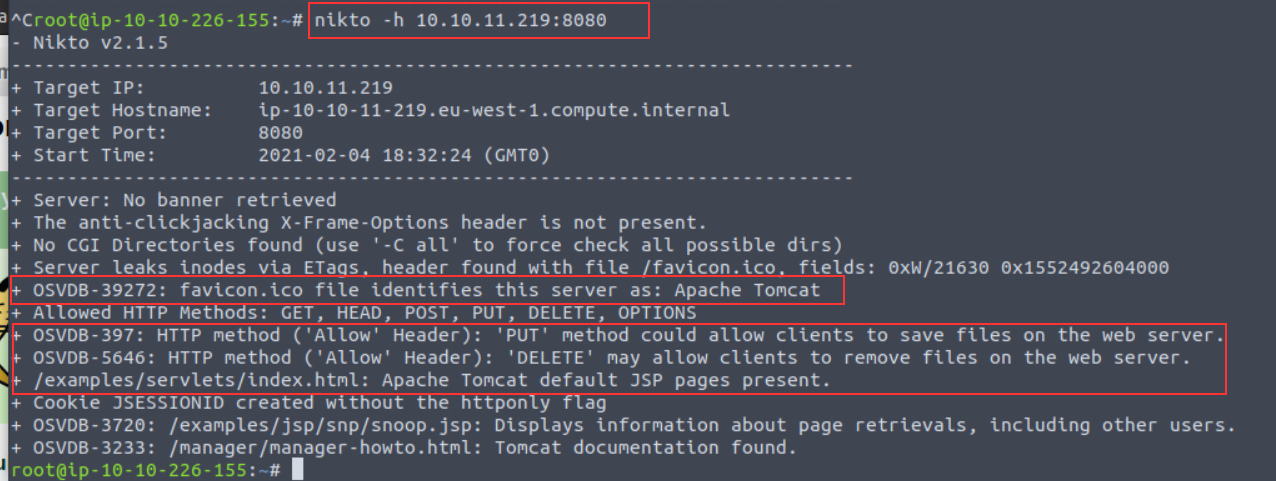
Note a few interesting things are given to us in this example:
Nikto has identified that the application is Apache Tomcat using the favicon and the presence of "/examples/servlets/index.html" which is the location for the default Apache Tomcat application.
HTTP Methods "PUT" and "DELETE" can be performed by clients - we may be able to leverage these to exploit the application by uploading or deleting files.
Scanning Multiple Hosts & Ports
Nikto is extensive in the sense that we can provide multiple arguments in a way that's similar to tools such as Nmap. In fact, so much so, we can take input directly from an Nmap scan to scan a host range. By scanning a subnet, we can look for hosts across an entire network range. We must instruct Nmap to output a scan into a format that is friendly for Nikto to read using Nmap's -oG flags
For example, we can scan 172.16.0.0/24 (subnet mask 255.255.255.0, resulting in 254 possible hosts) with Nmap (using the default web port of 80) and parse the output to Nikto like so: nmap -p80 172.16.0.0/24 -oG - | nikto -h -
There are not many circumstances where you would use this other than when you have gained access to a network. A much more common scenario will be scanning multiple ports on one specific host. We can do this by using the -p flag and providing a list of port numbers delimited by a comma - such as the following: nikto -h 10.10.10.1 -p 80,8000,8080

Introduction to Plugins
Plugins further extend the capabilities of Nikto. Using information gathered from our basic scans, we can pick and choose plugins that are appropriate to our target. You can use the --list-plugins flag with Nikto to list the plugins or view the whole list in an easier to read format online.
Some interesting plugins include:
apacheusers
Attempt to enumerate Apache HTTP Authentication Users
cgi
Look for CGI scripts that we may be able to exploit
robots
Analyse the robots.txt file which dictates what files/folders we are able to navigate to
dir_traversal
Attempt to use a directory traversal attack (i.e. LFI) to look for system files such as /etc/passwd on Linux (http://ip_address/application.php?view=../../../../../../../etc/passwd)
We can specify the plugin we wish to use by using the -Plugin argument and the name of the plugin we wish to use...For example, to use the "apacheuser" plugin, our Nikto scan would look like so: nikto -h 10.10.10.1 -Plugin apacheuser

Verbosing our Scan
We can increase the verbosity of our Nikto scan by providing the following arguments with the -Display flag. Unless specified, the output given by Nikto is not the entire output, as it can sometimes be irrelevant (but that isn't always the case!)
1
Show any redirects that are given by the web server.
Web servers may want to relocate us to a specific file or directory, so we will need to adjust our scan accordingly for this.
2
Show any cookies received
Applications often use cookies as a means of storing data. For example, web servers use sessions, where e-commerce sites may store products in your basket as these cookies. Credentials can also be stored in cookies.
E
Output any errors
This will be useful for debugging if your scan is not returning the results that you expect!
Tuning Your Scan for Vulnerability Searching
Nikto has several categories of vulnerabilities that we can specify our scan to enumerate and test for. The following list is not extensive and only include the ones that you may commonly use. We can use the -Tuning flag and provide a value in our Nikto scan:
File Upload
Search for anything on the web server that may permit us to upload a file. This could be used to upload a reverse shell for an application to execute.
0
Misconfigurations / Default Files
Search for common files that are sensitive (and shouldn't be accessible such as configuration files) on the web server.
2
Information Disclosure
Gather information about the web server or application (i.e. verison numbers, HTTP headers, or any information that may be useful to leverage in our attack later)
3
Injection
Search for possible locations in which we can perform some kind of injection attack such as XSS or HTML
4
Command Execution
Search for anything that permits us to execute OS commands (such as to spawn a shell)
8
SQL Injection
Look for applications that have URL parameters that are vulnerable to SQL Injection
9
Saving Your Findings
Rather than working with the output on the terminal, we can instead, just dump it directly into a file for further analysis - making our lives much easier!
Nikto is capable of putting to a few file formats including:
Text File
HTML report
We can use the -o argument (short for -Output) and provide both a filename and compatible extension. We can specify the format (-f) specifically, but Nikto is smart enough to use the extension we provide in the -o argument to adjust the output accordingly.
For example, let's scan a web server and output this to "report.html": nikto -h http://ip_address -o report.html


Nikto Practical (Deploy #3)
What is the name & version of the web server that Nikto has determined running on port 80?
Kali

There is another web server running on another port. What is the name & version of this web server?
Kali

What is the name of the Cookie that this JBoss server gives?
Kali

Last updated